How to Choose the Right
Abrasive Grit
Grit is the first decision you make and the one that costs the most when you get it wrong. Too coarse and you're chasing scratches for an hour. Too fine and you're burnishing instead of cutting. Here's the chart, by material and by finish.
Most abrasive waste isn't caused by cheap product. It's caused by starting at the wrong grit.
Start too coarse and you put scratches into the part that take three more steps to remove — steps that cost you discs, belts, and shop time. Start too fine and the abrasive glazes over, stops cutting, and generates heat instead of chips. Either way you burn money and blame the disc.
This guide gives you the grit number to reach for based on two things you already know: what the part is made of, and what it needs to look like when you're done. Everything else — mineral, backing, pressure — follows from that.
Two Grit Systems. Know Which One You're Reading.
Before any chart is useful, check which scale the number is on. There are two in common use in North American shops, and they stop agreeing exactly where finishing work gets serious.
- CAMI — the North American scale (Coated Abrasives Manufacturers Institute, standardized under ANSI B74.18). Written as a plain number: 80, 120, 320.
- FEPA — the European scale. Written with a P prefix: P80, P120, P320. FEPA grading holds a tighter particle size distribution, which is why it dominates automotive refinish work.
Through the coarse and medium range the two scales track closely. Above roughly 220 they diverge hard, and the gap widens fast. CAMI 400 is not P400 — it's closer to P800. If you assume they're the same in a polishing progression, you will skip two full steps and wonder why the scratches won't come out.
| CAMI (US) | FEPA (P-Grade) | Working Range |
|---|---|---|
| 36 | P36 | Heavy stock removal |
| 60 | P60 | Heavy stock removal |
| 80 | P80 | Weld knockdown / rough shaping |
| 100 | P100 | Blending |
| 120 | P120 | Blending |
| 150 | P150 | Blending / paint prep |
| 180 | P180 | Paint prep |
| 220 | P220 | Last point of close agreement |
| 240 | P280 – P320 | Divergence begins |
| 320 | P400 | Fine finishing |
| 400 | P800 | Fine finishing |
| 600 | P1200 | Pre-polish |
| 800 | P1500 | Pre-polish |
| 1000 | P2000 | Polish |
↔ Scroll table horizontally on mobile
Rule of Thumb
Below 220, treat CAMI and FEPA as interchangeable for practical shop work. Above 220, never substitute one for the other without converting. The finer you go, the bigger the error.
Three Questions Before You Grab a Disc
Grit selection isn't a preference. It's the answer to a short sequence of questions. Work them in order — each one narrows the next.
-
What's the material?
Material determines the mineral more than the grit. Carbon steel, stainless, aluminum, and cast iron all fail differently under the same abrasive. Get the mineral wrong and no grit number saves you.
-
How much are you removing?
A weld bead is stock removal. A scratch is blending. A dull spot is finishing. Estimate the depth of what has to disappear — that sets your starting grit, not your finishing grit.
-
What does "done" look like?
Ready for paint? A uniform satin grain? Mirror? The required end finish sets your final grit. Everything between the start and the finish is just the progression.
Two numbers, then. Start grit — the coarsest thing that removes the defect. Finish grit — the finest thing the spec requires. The chart below gives you both.
Grit Selection by Material & Finish
Find your material, then your job. Grits are CAMI unless noted. Ranges are starting points for hand and portable power tool work — bench and machine setups may run coarser.
| Job / Finish Goal | Start Grit | Finish Grit | Mineral | Notes |
|---|---|---|---|---|
| Carbon & Mild Steel | ||||
| Weld removal / heavy stock | 24 – 40 | 60 – 80 | Zirconia / Ceramic | Let the mineral cut. Leaning on the tool crushes grain and shortens disc life. |
| Blending & scratch removal | 80 – 120 | 180 | Zirconia / Alum. Oxide | Step down one grade at a time. 80 straight to 220 leaves ghosting. |
| Prep for primer / coating | 120 | 180 – 220 | Aluminum Oxide | Coatings need tooth. Too fine and adhesion suffers — check the coating TDS. |
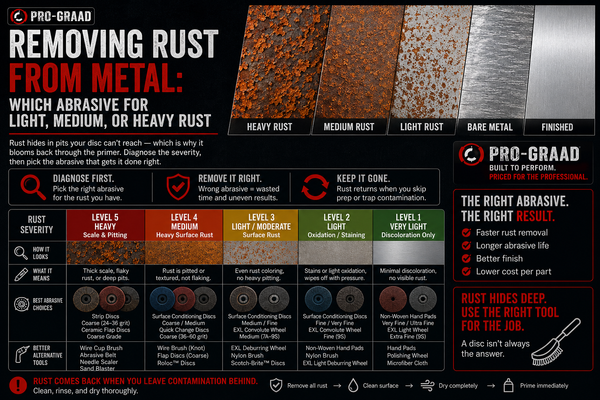
| Rust removal (light surface) | Non-woven Coarse | Non-woven Med. | Alum. Oxide / SiC | Non-woven strips oxide without cutting base metal or changing dimension. |
| Rust removal (pitted / heavy) | 36 – 60 | 120 | Zirconia | Pits go deeper than they look. Cut to clean metal or the rust comes back. |
| Stainless Steel | ||||
| Weld removal / heavy stock | 36 – 60 | 80 – 120 | Ceramic | Ceramic cuts cool. Heat is the enemy here — blue means you overcooked it. |
| Heat tint / discoloration | Non-woven Med. | Non-woven V.Fine | Aluminum Oxide | Non-woven lifts tint without gouging. Keep the tool moving. |
| Blending to uniform | 120 | 180 – 220 | Ceramic / Alum. Oxide | Match the grain direction of the surrounding panel or the repair shows. |
| #4 satin / brushed finish | 120 – 180 | 180 – 240 | Alum. Oxide / Non-woven | Straight-line passes only. Verify the target finish spec on the print. |
| Pre-polish / mirror prep | 320 | 600 – 800 | Silicon Carbide | Full progression, no skipping. Every skipped step doubles the next one. |
| Aluminum & Non-Ferrous | ||||
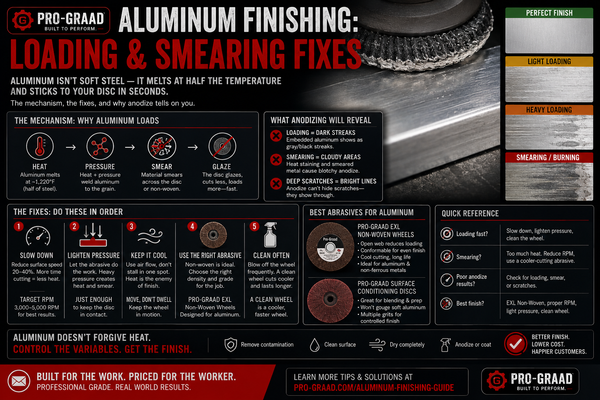
| Weld removal / heavy stock | 40 – 60 | 80 – 120 | Ceramic / Zirconia | Open coat only. Closed coat loads solid in seconds on aluminum. |
| General blending | 80 – 120 | 180 – 220 | Alum. Oxide (stearated) | Stearate coating resists loading. Lower the RPM — aluminum smears when hot. |
| Prep for coating / anodize | 120 – 180 | 220 – 320 | Aluminum Oxide | Anodizing shows everything underneath. Uniformity beats fineness. |
| Polish / bright finish | 320 | 600 – 1000 | Silicon Carbide | Wet sanding above 400 flushes swarf and stops pigtail scratches. |
| Cast Iron | ||||
| Flash / parting line removal | 24 – 50 | 80 | Zirconia / Alum. Oxide | Abrasive and dusty. Cast iron eats discs — budget for it. |
| Surfacing / blending | 80 – 120 | 180 | Aluminum Oxide | Porosity means you'll find voids. Fine grits won't hide them. |
| Hardened & Tool Steel | ||||
| Stock removal | 36 – 60 | 120 | Ceramic | Ceramic self-fractures under pressure and stays sharp. Others just glaze. |
| Finishing | 180 | 320 – 400 | Ceramic / Alum. Oxide | Watch for burn. A blued edge means the temper is gone. |
| Brass, Bronze & Copper | ||||
| Deburr & clean | 120 – 180 | 220 – 320 | Silicon Carbide | Soft metals load fast. Light pressure, open coat, fresh abrasive. |
| Polish | 320 | 600 – 1000 | Silicon Carbide / Non-woven | Finish with ultra fine non-woven before compound. |
| Titanium & Superalloys | ||||
| Stock removal | 36 – 60 | 120 | Ceramic | Low heat conductivity — heat stays in the cut. Ceramic, coolant, patience. |
| Finishing | 180 | 320+ | Ceramic / SiC | Titanium fines are combustible. Wet methods and clean housekeeping. |
| Paint, Body Filler & Refinish (FEPA P-Grades) | ||||
| Paint stripping to bare metal | P40 – P80 | P120 | Aluminum Oxide | Keep it moving. Stationary sanding warps thin panels. |
| Shaping body filler | P80 | P180 | Aluminum Oxide | Shape while it's green. Cured filler costs you three times the effort. |
| Primer sanding | P320 | P400 – P600 | Alum. Oxide / SiC | Follow the paint system TDS — it overrides any general chart, including this one. |
| Clearcoat cut & buff | P1500 | P2000 – P3000 | Silicon Carbide | Wet only. Then compound and polish. |
| Wood | ||||
| Rough milling / heavy sanding | 60 – 80 | 100 – 120 | Aluminum Oxide | With the grain. Cross-grain scratches surface the moment you stain. |
| Prep for stain | 120 | 150 – 180 | Aluminum Oxide | Past 220, softwoods burnish and stain goes blotchy. |
| Between-coat finish sanding | 220 | 320 – 400 | SiC / Non-woven | You're knocking down nibs, not removing wood. Almost no pressure. |
| Plastics, Fiberglass & Composites | ||||
| Trimming / shaping | 80 – 120 | 180 | Aluminum Oxide | Heat melts and gums. Slow down and back off the pressure. |
| Finishing / clarity | 320 | 600 – 1500 | Silicon Carbide | Wet sanding. Composites: respect the fiber dust — use extraction. |
↔ Scroll table horizontally on mobile
Where the Chart Stops
This chart is a starting point, not a spec. If your print calls out a surface finish requirement, or your coating manufacturer publishes a required substrate profile, those numbers win. Always. A general chart doesn't know your part.
The Progression Rule: Don't Skip Steps
Every grit does exactly one job: remove the scratches left by the grit before it. That's the whole game. Once you understand it, progression stops being guesswork.
The working rule is never skip more than one step in the sequence. A clean progression looks like this:
80 → 120 → 180 → 220 → 320 → 400
Jump from 80 straight to 320 and the 320 spends its life fighting 80-grit trenches. It will get there eventually — after you've burned through three times the discs a 120 and a 180 would have cost, and left ghost scratches that only show up under the coating.
- Change direction every step. Cross-hatch roughly 45–90° from the previous grit. When the old scratch pattern is gone, that step is done. This is the only reliable way to know.
- Don't rush the coarse step. The first grit does the real work. Everything after it is cleanup. Leave a defect at 80 and you'll be back at 80 an hour later.
- Stop when the spec is met. Sanding to 600 for a part that gets powder coated is money set on fire — and the coating will adhere worse.
Non-Woven Grades: A Different Language
Non-woven abrasives — surface conditioning discs, convolute and unitized wheels, hand pads — don't use grit numbers. They use grades: Coarse, Medium, Very Fine, Super Fine, Ultra Fine.
That's not marketing. It reflects how they work. A coated disc presents a rigid layer of mineral at a fixed height. A non-woven abrasive holds mineral in an open, resilient nylon web that conforms to the part and flexes under load. Same nominal particle, very different scratch.
| Non-Woven Grade | Approx. Scratch Equivalent | Typical Use |
|---|---|---|
| Coarse | ~80 – 100 | Weld cleaning, coating and rust removal, aggressive blending |
| Medium | ~120 – 180 | General deburring, heat tint, scratch blending |
| Very Fine | ~220 – 320 | Satin finishing, light deburr, paint prep |
| Super Fine | ~400 – 600 | Fine satin, decorative finishing, pre-polish |
| Ultra Fine | ~800 – 1000 | Final conditioning ahead of polish or compound |
↔ Scroll table horizontally on mobile · Equivalents are approximate
Why "Approximate" Matters
These equivalents are working guides, not conversions. A Medium non-woven and a 150-grit coated disc leave visibly different surfaces — the non-woven cuts softer, runs cooler, and won't undercut an edge. When the finish has to match an existing surface, test on scrap first. Every time.
Grade names are broadly consistent across the industry. Color coding is not — every manufacturer uses its own. Read the grade, not the color.
Mineral Matters More Than You Think
Grit sets the scratch. Mineral sets whether you get a scratch at all. Four minerals cover essentially all metalworking:
| Mineral | Best For | Behavior Under Load |
|---|---|---|
| Aluminum Oxide | General purpose, wood, carbon steel, paint prep | Tough, blocky, forgiving. The default for a reason — but dulls rather than refreshing. |
| Zirconia Alumina | Steel stock removal, high-pressure grinding | Self-sharpens under pressure. Needs load to work — go light and it just polishes. |
| Ceramic | Stainless, hardened steel, titanium, superalloys | Micro-fractures continuously to expose fresh edges. Cuts cool. Costs more, lasts longer. |
| Silicon Carbide | Non-ferrous, glass, stone, plastics, wet sanding | Hardest and sharpest, but friable. Cuts fast, breaks down fast. Not for high-pressure steel work. |
The Stainless Rule Nobody Should Break
Never use an abrasive on stainless that has touched carbon steel. Embedded iron particles transfer to the stainless surface and rust — sometimes weeks later, after the part has shipped. Dedicate your stainless abrasives and keep them separate. This is a contamination problem, not an abrasive-quality problem, and no disc on the market will save you from it.
Five Ways Shops Waste Abrasive
- Starting too coarse "to save time." You'll spend that time back, doubled, removing your own scratches.
- Leaning on the tool. Every abrasive has a pressure window. Above it you crush grain and generate heat instead of chips. The disc is engineered to cut — let it.
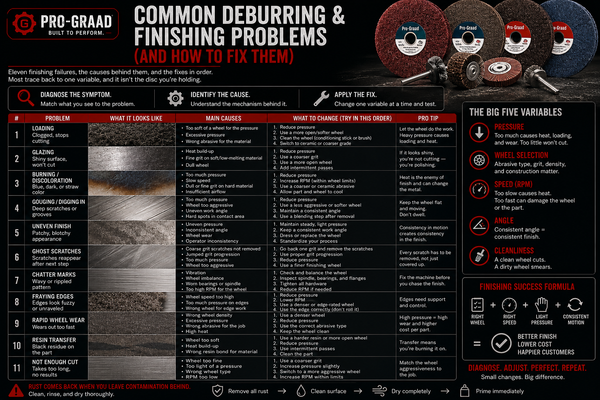
- Running a loaded disc. A clogged abrasive stops cutting and starts burnishing. It's not saving you money at that point, it's costing you heat damage. Clean it or replace it.
- Wrong RPM. Too slow and you're not cutting. Too fast and you're generating heat. Check the tool's rated speed against the abrasive's max safe speed — and never exceed the abrasive's rating.
- Finishing past the spec. Extra steps that nobody asked for are pure cost. Know the required finish before you start, and stop when you hit it.
Common Questions
Is a higher grit number coarser or finer?
Finer. The number reflects how many openings per linear inch the screen mesh has that graded the particles. More openings means smaller particles. So 40 grit is aggressive, 400 grit is fine.
Can I skip grits to save time?
One step, sometimes — 80 to 150 will usually work. Two or more, no. The finer grit has to remove every scratch the coarser one left, and past one step it can't do that efficiently. You'll burn more abrasive skipping than you would have running the step.
What grit should I use before painting?
For most industrial coatings on steel, 120–180 gives adequate anchor profile. For automotive primer, P320–P400. But the coating manufacturer's technical data sheet is the authority — read it. Too fine a surface is a real adhesion failure mode.
Why does my disc stop cutting after a minute?
Usually loading or glazing. Loading means swarf packed into the abrasive — common on aluminum, soft metals, and paint. Fix it with open coat or stearated product and less pressure. Glazing means the grain dulled without fracturing — often a mineral mismatch, like zirconia run at low pressure or aluminum oxide on hardened steel.
P120 or 120 grit — does it matter?
At 120, barely. At 400, absolutely — CAMI 400 is roughly P800. Below 220 the scales run close enough for shop work. Above 220 always convert before you substitute.
What's the finest grit worth using on bare steel?
Depends entirely on the goal. For coating, stop at 180–220 — finer hurts adhesion. For a decorative or hygienic finish, keep going to 320 and beyond. Sanding steel to 600 and then priming it is wasted work.
Built for the Work.
Priced for the Worker.
Pro-Graad is an independent brand making coated and non-woven abrasives for shops that measure performance in parts finished, not in logos on the box. Full grit ranges, honest specs, no premium tax.
Shop the Full RangeQuestions on grit selection for a specific job?
info@pro-graad.com