Five Sanding Belt Mistakes That Ruin Your Projects

Using sanding belts seems straightforward, but it is easy to make mistakes that ruin your workpiece, wear out your belts prematurely, or even cause injury. Most people assume the problem lies with the wood, the machine, or bad luck. In my experience, the culprit is almost always one of five avoidable errors that repeat themselves across workshops everywhere, from weekend hobbyists to seasoned DIYers.
With over 40,000 people searching for guidance on sanding belts every month, the demand for clear, actionable answers is undeniable. Whether you just picked up your first belt sander or you have been fighting burn marks for years, this guide will help you diagnose exactly what is going wrong and fix it fast.
Key Takeaways
- Wrong grit selection ruins surfaces: Skipping grits, for example going directly from 80 to 220, means the 220 grit struggles to remove the deep 80-grit scratches, leaving a less-than-ideal finish. Always step through grits progressively.
- Excessive pressure destroys belts and wood: Excessive pressure does not make the belt cut faster; it only generates heat, clogs the belt, and risks stalling the motor or creating gouges. Let the abrasive do the work.
- Clogged belts cause burn marks: When a belt becomes clogged, it generates more heat, removes material unevenly, and can even leave burn marks or scratches on the workpiece. A rubber cleaning stick solves this in seconds.
- Poor tracking leads to belt failure: When the sanding belt shifts or slips off track, it affects tracking, causes uneven sanding, and can damage the belt. Check and adjust tracking before every session.
- Bad storage degrades belts before first use: Sanding belts can degrade over time due to improper storage or handling, and exposure to extreme temperatures, humidity, or direct sunlight can break down the adhesives holding the abrasives together and the belt itself.
Quick-Start Prioritization Framework
Use this table to identify which mistake is most likely causing your current problem, then jump straight to that section.
| Mistake | Most Common Symptom | Effort to Fix | Time to See Results |
|---|---|---|---|
| Wrong Grit | Scratches remain, finish looks rough | Low | Immediate |
| Too Much Pressure | Burn marks, gouges, motor bogging | Low | Immediate |
| Ignoring Belt Clogging | Slow cutting, surface scorching | Low | Minutes |
| Skipping Tracking Setup | Belt drifts, uneven wear, belt breaks | Medium | Per session |
| Improper Belt Storage | Premature belt failure, joint snapping | Low | Ongoing |
Start here if you are:
- A first-time belt sander user: Focus on grit selection first, the right grit for the right stage is the single highest-impact skill.
- Seeing burn marks on your wood: Address pressure and clogging together; they compound each other quickly.
- Breaking belts repeatedly: Audit your tracking setup and storage conditions before spending money on replacements.
Mistake 1: Choosing the Wrong Grit for the Job
Why Grit Selection Matters More Than You Think
The grit numbering system is counter-intuitive: lower numbers indicate fewer, larger abrasive particles per square inch, resulting in a coarser abrasive that removes material more aggressively. A lower grit number indicates larger, more aggressive particles suitable for rapid material removal, while a higher grit number indicates smaller, finer particles used for smoothing surfaces and preparing for finishing.
In practice, this means that reaching for a fine belt on a rough surface forces you to spend far more time and energy than necessary. The reverse, using a coarse belt on a nearly finished surface, risks destroying hours of careful work in seconds.
40 to 60 grit is best suited for the heaviest work. When you are performing tasks such as smoothing surfaces or removing minor blemishes, you are better off using sandpaper with 80 to 120 grit. For the end of a job, when you are finishing surfaces, a fine sandpaper with 350 to 600 grit is the ideal choice. If you are not hitting these targets for the right phases, your project will show it.
The Grit-Skipping Trap
The most common grit mistake is jumping too many numbers at once. When sanding rough lumber, you might start with 60 or 80 grit, then move to 120, then 180, and perhaps 220 grit before applying a stain or clear coat. The "best" grit at any given moment is the one that effectively removes the scratches from the previous step without creating new, deeper scratches. Skipping steps does not save time; it creates rework.
If you plan to stain wood, you usually need to progress to even finer grits, like 180 or 220, to ensure the stain absorbs evenly without highlighting scratches. Stain is unforgiving: it seeps into every scratch a camera would miss under plain lighting.
Pro Tip: Mark your surface lightly with a pencil before each grit change. Sand until the pencil marks disappear completely. If marks from a lower grit remain visible when you step up, you moved on too early. This technique costs nothing and eliminates guesswork entirely.
Mistake 2: Applying Too Much Pressure
The Pressure Myth That Costs You Projects
Let's be honest, when the sanding is slow, pressing harder feels like the logical fix. It is not. Overtaxing a sanding belt will allow the material being sanded to push against the grains and resin coat, heating up and degrading the belt. This not only destroys the belt but also starts the heat and compression that destroys the surface of the wood.
According to Overtaxing a sanding belt will, overtaxing a belt is one of the most common mistakes in the entire sanding process, therefore, if your belt is wearing out faster than expected, check your pressure before anything else.
What Excessive Pressure Actually Does
Keep the sander moving at all times while it is in contact with the workpiece. Pausing in one spot, even for a second, will quickly sand a low spot or divot into the material due to the aggressive nature of belt sanders.
Proper sanding belt selection guides note that moving the belt sander side to side helps average out the cut and prevents digging in, rather than sanding forward and backward in one spot.
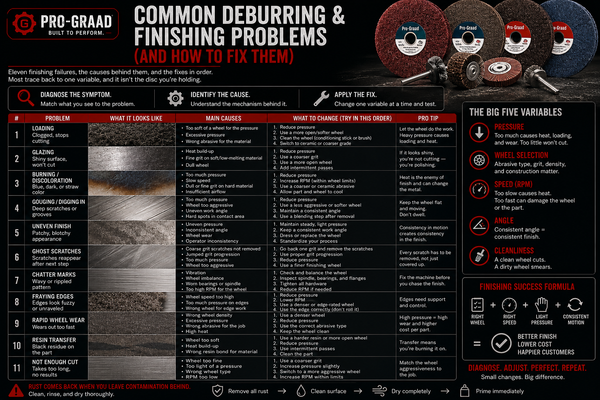
Many beginners struggle with gouges, burn marks, or hollowed areas caused by pressing too hard, staying in one spot, or moving too slowly. The fix is simple: lift slightly off the surface, apply only gentle pressure, and keep the sander in motion.
Pro Tip: If your sander motor sounds like it is straining or slowing noticeably when the belt contacts the wood, that is a clear sign of excessive pressure. The belt should be doing the cutting, your job is to guide the machine steadily, not push it into the surface.
Mistake 3: Ignoring Belt Clogging and Loading

What "Loading" Really Means
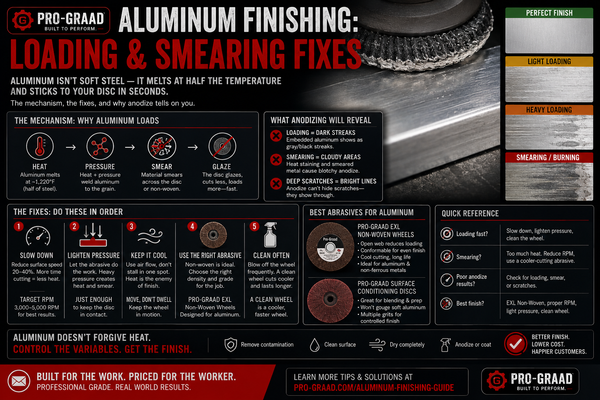
Sanding belts are designed to cut efficiently, but material removal inevitably leads to loading, where wood dust, paint, or resins clog the space between abrasive grains. This premature dulling, or "loading," reduces cutting power, generates excess heat, and results in poor surface finishes.
I have found that most hobbyists interpret a slow-cutting belt as a dull belt and toss it immediately. Most of the time, the belt is clogged, and cleaning it takes under a minute.
Belts become clogged especially if you work a lot with resinous wood or paint. When the belts are left uncleaned, not only will sanding tasks take longer, but all that accumulated debris can leave marks on the workpiece surface or even burn it, resulting in a flawed finish.
How to Clean a Clogged Belt
The best and easiest belt sander cleaner is an abrasive cleaning stick. An abrasive cleaning stick is a rubberized stick you hold against a sanding belt as it runs through the sander. Cleaning sticks work on wood, paint, and wood finish residue, along with metal shavings and other materials that commonly clog sanding belts.
According to This Old House's sanding belt maintenance guide, TOH general contractor Tom Silva also recommends open-coat belts for soft, pitchy woods like pine, "the spaced-out grit reduces clogging in the first place, meaning less frequent cleaning." Therefore, if you consistently work with softwoods or paint-covered surfaces, switching to an open-coat belt prevents half the problem before it starts.
Match belt type to your material use open-coat belts when sanding softwoods or materials prone to loading. Closed-coat belts pack the abrasive tightly and cut fast on metal and hardwoods, but they clog quickly on softer, resinous materials.
Prevention Over Cure
The best and easiest belt sander clogging from the start and reduces friction heat, extending the life of the belt. An abrasive belt grease stick applied before a session costs very little and meaningfully extends belt life, therefore, keep one at your workstation and use it the way a chef sharpens a knife before cooking, proactively rather than reactively.
Mistake 4: Skipping Proper Belt Tracking Setup
Why Tracking Failures Destroy Belts and Projects
Incorrect tension pressure, worn or misaligned rollers, incorrect grit for stock removal, a blocked laser eye, defective or poor quality sanding belts, and improper belt storage techniques could all lead to tracking problems. Poor tracking is rarely one thing; it is usually a combination, which is why it frustrates so many people.
If your belt has not been tracking correctly on your machine, it will slide off its rollers or become misaligned during operation, which will likely lead to a tear. There are various causes of improper tracking. A belt that does not track properly will misalign during operation or slide off its rollers. Improper tracking can also lead to premature wearing or breaking of the belt.
This is where money gets wasted fast. Every broken belt that results from uncorrected tracking is money spent that a 30-second adjustment would have saved.
Tension Is the Starting Point
In general, paper-backed belts need a setting of 45-55 psi while cloth belts do best at 55-65 psi and the recommended setting for polyester is 65-85 psi. If you do not know what backing your belt uses, check the label, then match the tension to the specification before you touch the tracking knob.
If the tension setting is too tight, it overwhelms the tracking cylinder and shortens the working life of the belt, mainly because it cannot absorb fluctuating or high shock loads. You will usually see breakage near the joining tape or on the body of the belt.
According to Benchmark Abrasives' belt adjustment guide, proper tracking prevents the belt from slipping off or wearing unevenly. Therefore, before every single session, power the sander on briefly with no workpiece present and confirm the belt is running centered on the rollers.
Pro Tip: After installing a new belt, run the sander for 30 seconds without touching any material. Watch where the belt rides. Adjust the tracking knob in small half-turn increments, wait a few seconds to observe the change, and repeat until the belt stays centered. Never adjust tracking while the belt is under load from the workpiece.
Mistake 5: Storing Sanding Belts Incorrectly
Why Storage Determines Belt Performance Before You Even Begin
After years of advising DIYers, I have seen many people blame a poor finish on technique when the real problem was a belt that was already compromised before the job started. Abrasive grains are bonded to a backing using a resin-based bonding agent, and the backing material naturally absorbs moisture like a sponge. This absorption affects the belt's essential balance.
If the belt becomes too dry, it can become weak and stiff, increasing the risk of tearing, especially at belt joints. Conversely, if it becomes too wet, the fibers swell, the bonding agent softens, and the abrasive material can peel away rapidly.
The window of acceptable conditions is narrower than most people realize.
The Right Way to Store Sanding Belts
Sanding belts can be damaged by heat and humidity. It is best to store your belts at a temperature of 60 to 80°F with a relative humidity of around 45 percent. Any lower and they can become too brittle, while higher humidity can soften them to the point that they tear or break apart more easily.
Humidity can weaken the belt joint and cause it to snap on use. When a belt snaps it can end up smacking your face or arms in its rotation. This is a real safety risk, not just a quality concern, and it is entirely preventable.
According to Red Label Abrasives' comprehensive abrasives storage guide, you should remove abrasive belts from their original packaging at least 24 hours before scheduled use and hang them on a rack near the machine you will use them on, giving the belts a chance to adjust to the temperature and humidity of the workspace. Therefore, if you plan to sand on Saturday morning, hang your belts in the shop on Friday.
Sanding belts do have a shelf life of 3-5 years when stored properly. If you are reaching for belts that have been sitting on a concrete floor in an unheated garage for two winters, replace them before you start, the time spent chasing poor results will cost more than the belts.
A Note on Dust Safety
No discussion of sanding belt technique is complete without acknowledging the dust it produces. In general, exposure to excessive amounts of wood dust is considered to have an irritant effect on eyes, nose and throat in addition to pulmonary function impairment and is considered a human carcinogen.
Wood dust is classified as a Group 1 carcinogen by the International Agency for Research on Cancer, and woodworkers exposed to it face nasal adenocarcinoma rates more than 10 times higher than workers in other industries. Therefore, if you are not wearing an N95-rated respirator and running a dust collection system whenever you operate a belt sander, start today, no project finish is worth permanent lung damage.
OSHA's wood dust hazard guidance recommends engineering controls such as local exhaust ventilation as the first line of defense. For home workshops, a dedicated shop vacuum with a HEPA filter connected directly to your sander is an affordable and highly effective solution.
How Pro-Graad Products Address These Mistakes
Pro-Graad's range of sanding belts is built to reduce the impact of all five mistakes covered here. Quality backing materials handle humidity variation more reliably than budget alternatives, consistent abrasive grain distribution supports predictable grit progression, and durable joint construction reduces breakage from tracking issues. When the belt itself is reliable, technique problems become much easier to isolate and correct.
Frequently Asked Questions
How do I know when a sanding belt needs to be replaced rather than cleaned?
If you have got a damaged belt - whether from frayed edges, broken joints, tears, or snapping, something is amiss. A cleaning stick can restore a clogged belt, but physical damage means it is time for a replacement. If the belt still cuts slowly after cleaning, the abrasive grains themselves have worn flat, replace it.
What causes burn marks when using a belt sander?
Burn marks almost always come from one of three sources: the issue is burn marks appearing on the wood surface during sanding, the solution is to reduce the pressure applied to the workpiece, avoid sanding at a single spot for too long, and use finer grits or consider using a cooler-running sanding belt. A clogged belt is also a frequent cause, since blocked grit generates far more friction heat than a clean belt.
Can I run a sanding belt in either direction?
Certain types of joints are reversible, meaning they can run in both directions on the machine. Verify whether your belt joint type is uni- or bi-directional. Running a unidirectional belt backward will stress the joint and shorten the belt's life significantly, sometimes leading to sudden breakage.
How often should I check belt tracking?
Perform regular inspections and adjust your belt sander to ensure it operates efficiently and prevents issues like belt slipping or tracking problems. Correct alignment ensures better sanding results and helps the abrasive belts and power sander last longer. In practice, check tracking every time you install a new belt and briefly verify it at the start of each work session.
Is it safe to store sanding belts in an unheated garage or shed?
Storing sanding belts in conditions with high humidity, extreme temperatures, or direct sunlight can weaken the adhesive and backing, leading to premature breakage. Store them in a cool, dry place away from direct sunlight. An unheated garage in a climate with cold winters or humid summers is not an appropriate long-term storage environment. If that is your only option, keep belts in sealed plastic bags and allow them to acclimate to your workshop temperature for 24 hours before use.
Sources
-
Common Mistakes When Using Sanding Belts, Novogrit Abrasive. Covers common errors and how to avoid them. https://novogrit.com/common-mistakes-when-using-sanding-belts-how-to-avoid-them/
-
Does Your Sanding Make Sense?, Woodworking Network / Dixon Abrasives. Analysis of overtaxing belts and grit sequencing. Overtaxing a sanding belt will
-
Sanding Belt Grit Sizes Explained, Novogrit Abrasive. Grit selection guide for progression and material type. https://novogrit.com/sanding-belt-grit-sizes-explained-choosing-the-right-abrasive-for-your-project/
-
Choosing the Right Sanding Belt, Empire Abrasives. Practical guide to grit and abrasive grain selection. Proper sanding belt selection guides
-
How to Clean Sanding Belts and Tips to Extend Belt Life, Empire Abrasives. Cleaning methods including abrasive cleaning sticks. The best and easiest belt sander
-
How to Properly Clean Clogged Sanding Belts, Benchmark Abrasives. Covers loading, cleaning, and open vs. closed coat belts. https://benchmarkabrasives.com/blogs/sanding/how-to-properly-clean-your-sanding-belts-to-extend-life
-
Tips for Keeping Sanding Belts Clean, This Old House. Practical cleaning techniques from TOH general contractor Tom Silva. https://www.thisoldhouse.com/woodworking/21019310/keeping-sanding-belts-clean
-
How to Diagnose and Fix Belt Sander Tracking Problems, Red Label Abrasives. Tension specifications and tracking diagnostics. https://www.redlabelabrasives.com/blogs/news/how-to-diagnose-and-fix-belt-sander-tracking-problems
-
How Do I Adjust a Belt Sander?, Benchmark Abrasives. Step-by-step tracking and tensioning guide. https://benchmarkabrasives.com/blogs/sanding/how-do-i-adjust-a-belt-sander
-
How to Store Abrasives for the Best Performance, Red Label Abrasives. Storage conditions, temperature, humidity, and shelf life. https://www.redlabelabrasives.com/blogs/news/how-to-store-abrasives-for-the-best-performance
-
How Humidity Impacts Sanding Belts, Benchmark Abrasives. How moisture affects belt backing and bonding agents. https://benchmarkabrasives.com/blogs/sanding/how-humidity-impacts-sanding-belts
-
Comprehensive Sanding Belt Troubleshooting Guide, Red Label Abrasives. Belt shelf life, breakage causes, and storage best practices. https://www.redlabelabrasives.com/blogs/news/comprehensive-sanding-belt-troubleshooting-guide
-
Top 8 Wide Belt Sanding Problems, Uneeda / Sandpaper.com. Machine maintenance and belt problems reference. https://www.sandpaper.com/articles/top-8-wide-belt-sanding-problems-how-to-solve-them-5-8/
-
Wood Dust, Hazard Recognition, OSHA. Official guidance on wood dust health and cancer risks. https://www.osha.gov/wood-dust/hazards
-
Woodworking Dust Monitoring: OSHA Compliance Guide 2026, Envigilance. IARC carcinogen classification and nasal cancer risk data. https://envigilance.com/blog/woodworking-dust-monitoring/
-
Pro-Graad Sanding Belts, Pro-Graad. High-quality abrasive belt range for professional and DIY use. https://pro-graad.com/