2026 Paint Prep Sanding Techniques for Professionals
Paint prep sanding is the step most people underestimate - and the step that determines whether a finish lasts two years or twenty. A 2023 report from Research and Markets shows that over 60% of paint defects result from skipping or poorly performing surface prep, such as sanding. If you are facing a painting project right now, that single statistic should reframe how much time you allocate before a brush ever touches the wall. Specifically: spend at least as much time on prep as you do on painting itself.
Over 25 years of industry data around 40% of documented coating questions have been related to adhesion problems resulting from poor surface preparation - and many industry veterans argue the true number is higher. The practical implication is direct: invest in better paint prep sanding, and you dramatically reduce the chance of callbacks, re-coats, and premature failure.
This guide covers everything you need to know about paint prep sanding in 2026 - from choosing the right grit to handling inter-coat sanding, wet versus dry methods, and the safety rules you cannot ignore.

Key Takeaways
-
Surface prep drives paint failure rates: Over 60% of paint defects trace back to surface preparation errors, and a Sherwin-Williams Automotive Finishes study identified poor sanding as the top cause of adhesion failure in repaint jobs. Therefore, budget a minimum of one hour of prep per two hours of painting.
-
Grit selection is non-negotiable: Start with a medium grit around 120 to 150 for rough surfaces or old paint removal, then finish with a fine grit of 220 to 320 for smoothing before painting. Skipping grits leaves scratch marks that show through the topcoat.
-
Sanding between coats produces better results: Each coat of paint or primer leaves behind minor dust nibs, brush marks, or raised fibers; light sanding smooths these out and helps the next layer bond evenly - without it, you risk an uneven sheen and visible texture even after multiple coats.
-
Wet and dry sanding serve different purposes: Dry sanding is typically used at the beginning of a project for aggressive material removal, designed to create visible scratch patterns that provide a strong mechanical key for primers and fillers to adhere to. Wet sanding belongs at the finishing stage for detail work.
-
Lead paint rules are mandatory for older homes: The EPA's RRP Rule requires that renovations of child-occupied facilities in buildings built before 1978 only be performed by lead-safe certified renovation firms. Test before you sand in any pre-1978 structure.
Quick-Start Prioritization Framework
| Strategy | Best For | Effort Level | Time to Results |
|---|---|---|---|
| Hand sanding with sanding block | Small patches, trim, corners | Low | Hours |
| Random orbital sander | Large flat surfaces, paint removal | Medium | Same day |
| Wet sanding | Final coat prep, detail automotive work | Medium | Same day |
| Dry grit progression (80-120-220) | Bare wood, heavy rust on metal | High | 1-2 days |
| Intercoat light sanding (220-320) | Between coats on any surface | Low | 30-60 minutes per coat |
| Full strip-and-sand (40-80 grit) | Severely deteriorated surfaces | High | Multiple days |
Start here if you are:
- A first-time DIYer: Use hand sanding with 120-grit on walls and progress to 220-grit for final smoothing - lowest risk of surface damage.
- A homeowner refreshing interior walls: Use a random orbital sander for large panels and finish by hand in corners - best balance of speed and control.
- A trade professional on a commercial job: Run the full grit progression, sand between every coat, and use a pole sander with dust extraction for maximum efficiency.
- Working on an older pre-1978 home: Test for lead first, then follow EPA's Renovation, Repair, and Painting Rule before any sanding begins.
Why Paint Prep Sanding Matters More Than the Paint Itself
Most homeowners and even some professionals fixate on paint brand and sheen level. In my experience, the paint choice accounts for maybe 20% of the final result. The other 80% is the preparation underneath it.
The Science of Adhesion
Paint sticks to surfaces through mechanical bonding - it flows into tiny grooves and abrasions created by sanding and grips as it dries. Adhesion in paints arises from several principles, including mechanical interlocking where the coating physically anchors into surface roughness, chemical bonding through interactions like covalent or hydrogen bonds between coating and substrate, and adsorption via van der Waals forces or diffusion across the interface. Sanding is the primary tool that creates the mechanical interlocking layer. Without it, paint sits on a glassy surface and peels under thermal cycling or moisture.
Sandpaper adds a subtle amount of texture to the surface that improves paint adhesion; you can sand the area before adding primer and even between individual coats of paint for a more durable finish. The action is deliberate: you are creating a microscopically roughened surface that multiplies the contact area between the coating and the substrate.
When Sanding Is Absolutely Required
Skipping essential steps like cleaning, repairing, and priming can lead to peeling and cracking paint if paint is applied over dirt or damaged surfaces, and without proper sanding and priming the final coat may appear blotchy or textured. Sanding is non-negotiable in these situations:
- You are painting over a glossy or semi-gloss existing finish
- You have applied spackle or joint compound for repairs
- The existing paint is peeling, chalking, or flaking
- You are painting bare wood, metal, or masonry for the first time
- More than five years have passed since the last coat
Pro Tip: Run a clean hand across any surface before you start. If it feels smooth to the touch after washing, scuff-sand with 150-grit before priming. If it feels rough or shows texture, start with 100-grit and work up. Your fingertips are your best diagnostic tool.
Understanding Sandpaper Grit: A Practical Reference
Getting grit selection right is the foundation of effective paint prep sanding. Choosing the right sandpaper for your project starts with understanding grit numbers; each number represents the sandpaper's coarseness, with lower numbers being coarser and higher numbers being finer, and coarser sandpaper sands material more aggressively than finer sandpaper. Use this as your working reference:
Grit Ranges and Their Jobs
Coarse (40-80 grit): Strip heavy rust, remove old thick paint layers, and shape automotive body filler. Sand with 80 grit to strip heavy rust and old paint layers. This range leaves aggressive scratch marks, so always follow with a finer grit before priming. If you leave 80-grit marks under primer, they will telegraph through to the topcoat.
Medium (100-120 grit): The workhorse for most residential prep. About 100 to 120 are the grit numbers to look for if you are repainting drywall. This range removes rough patches and old paint without tearing paper-faced drywall. On wood, 100-grit begins the leveling work before you step up to finer passes.
Fine (150-220 grit): The primary finish-prep range. Fine sandpaper is perfect for smoothing walls prior to painting. After medium-grit work, run a 180 or 220 pass to eliminate scratch marks and create a surface the paint can grip cleanly. This is also the correct grit for sanding primer before topcoats.
Very Fine to Ultra-Fine (240-400 grit): Very fine sandpaper with a 240 CAMI or FEPA P240 to P360 is best used when applying sanding finishes between consecutive coats when working with drywall or wood. Use 320 to 400 grit between paint coats to knock down dust nibs and brush marks without removing the underlying coating.
Super Fine (800 grit and above): Reserved for wet sanding automotive and lacquer finishes. Wet sanding is generally used for finer grits of 1000 to 3000 and is often used to remove imperfections in the paint finish or to smooth out orange peel.
Surface-Specific Grit Guide
Drywall: Entirely different from wood - you are smoothing joint compound, not removing material; start at 120 for rough shaping and 150 for final smoothing, and never go below 120 because coarser grits tear the paper face. Use a pole sander, never a belt sander, on drywall.
Wood: Stay away from coarse and very coarse grits which can cause damage to your surface; for primary shaping of wood and preparing unfinished wood for painting, use a medium sandpaper, and use finer sandpaper for finishing edges.
Metal: Start with 80 grit to strip heavy rust and old paint layers, switch to 120 grit to smooth the surface and remove coarse scratches, move to 220 grit to refine the surface and prepare for primer adhesion, then finish with 400 grit for an even paint-ready surface.

Pro Tip: Always buy 20% more sandpaper than you think you need. Latex paint clogs sandpaper faster than polyurethane, so budget 50% more sheets when removing latex from floors or trim. A clogged sheet stops cutting and starts burnishing, which glazes the surface and prevents adhesion.
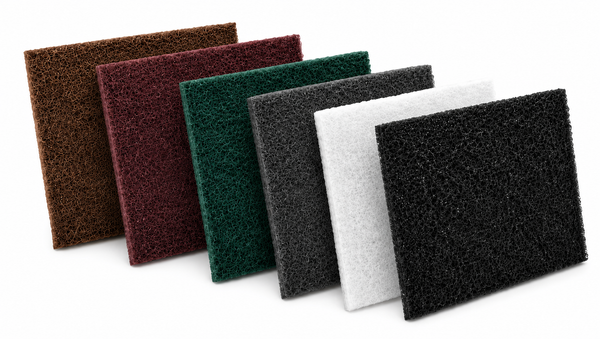
Choosing the Right Sanding Tool
The tool you pick matters as much as the grit. I've found that professionals who try to hand-sand everything on large projects lose hours of productivity and often produce uneven results. Match the tool to the scale and precision of the task.
Hand Sanding
Several tools can help with sanding paint, including sandpaper, electric sanders, and sanding blocks; electric sanders are quicker for large areas, while hand sanding provides precision for detailed work. Hand sanding with a sanding block is the right choice for:
- Small patched areas
- Trim, molding, and curved surfaces
- Corners that power tools cannot reach
- Intercoat sanding on furniture and cabinetwork
Always use a sanding block rather than bare fingers for flat surfaces. The block distributes pressure evenly and prevents the finger-shaped low spots that appear when you sand by hand without one.
Random Orbital Sanders
The random orbital sander is the professional's go-to for large-scale paint prep sanding. The random scratch pattern of a random orbital sander improves adhesion for new paint compared to linear sanders. The orbiting and rotating disc movement means the sander never travels the same path twice, virtually eliminating visible swirl marks that older sanders left behind.
Compared to hand sanding professionals report up to 60% time savings on large projects when using random orbital tools - therefore, if you are prepping more than 100 square feet of surface, a random orbital sander is an investment that pays back on the first job.
Pros:
- Significantly faster than hand sanding on large surfaces
- Minimal swirl marks due to random motion pattern
- Most models accept dust extraction bags or hose attachments
- Versatile across grits from 40 to 400
Cons:
- Cannot reach corners or tight molding details
- Requires dust extraction or a well-ventilated space
- Moderate learning curve for consistent pressure application
- Initial cost can be $80 to $200 for a quality model
Detail Sanders
A detail sander is your best bet when you need to get into tight spots; it has a small vibrating head with a triangular sandpaper attachment, making it easy to reach hard-to-reach corners that larger orbital or belt sanders cannot. These are particularly useful for window frames, baseboards, and stair spindles.
Pole Sanders
Consider a dust-free hand sander or pole sander for large areas and hard-to-reach spaces. Pole sanders extend your reach to ceilings and high walls without a ladder. They are the professional standard for drywall finishing and wall prep in large rooms.
Wet Sanding vs. Dry Sanding: Choosing the Right Method
One of the most common points of confusion in paint prep sanding is when to go wet and when to stay dry. Both methods are valid - they serve different purposes within the same project.
Dry Sanding
Dry sanding is typically used at the beginning of a project for aggressive material removal and surface preparation. It is the dominant method for stripping old paint, shaping body filler, and creating the mechanical tooth that primers need to grip. Dry sanding uses abrasive materials without any liquid lubricant, making it the most common method for initial surface preparation and aggressive material removal; the lack of lubricant allows the abrasive to act aggressively, enabling fast stock removal and efficient shaping of the substrate.
The trade-off is dust. One major drawback is dust: dry sanding produces significant airborne particles, which can contaminate your work area and pose respiratory hazards if proper protection is not used. Always use dust extraction or connect your sander to a vacuum.
Wet Sanding
Wet sanding, which involves sanding with the addition of water to act as a lubricant, is less abrasive than dry sanding and results in a smoother finish; it is best to wet-sand the final finish of a project. The water carries sanding debris away from the surface, prevents the paper from clogging, and reduces airborne dust.
As the abrasive cuts, the fluid acts as a lubricant, drastically reducing friction and the resulting heat generation; this cooling effect prevents the abrasive from prematurely dulling and ensures the surface material, especially delicate paint or clear coats, does not burn or melt.
Critical rules for wet sanding:
- Never wet-sand uncured primer - moisture penetrates the film and causes blistering later; epoxy and self-etch primers should always be sanded dry.
- Always let wet-sanded panels air-dry at least two hours before painting.
- Use silicon carbide paper, not aluminum oxide, for wet applications.
Pro Tip: Soak wet sanding paper in water with a few drops of washing-up liquid - this acts as a lubricant, preventing the sandpaper from binding or scratching too aggressively; then use circular motions rather than straight-line strokes, as circular movements minimize directional scratch marks and produce a uniformly matt surface that is ideal for repainting.
Sanding Between Coats: The Professional Habit That Makes the Difference
After years of working around painters, I've noticed one consistent difference between a fast, forgettable job and a finish that earns referrals: sanding between coats. Most casual painters skip it. Professionals never do.
Why Intercoat Sanding Works
Every coat of paint leaves behind tiny imperfections - whether dust nibs, roller texture, or raised grain; sanding knocks down these inconsistencies and provides a light tooth for the next coat to grip, ensuring better adhesion and a glass-like final appearance.
For water-based paints, drying time is usually 4 to 6 hours; for oil-based, 12 to 24 hours - and the paint must be fully dry before you sand. Sanding tacky paint clumps the abrasive, tears the surface, and forces a complete restart.
Grit Selection for Intercoat Sanding
Intercoat sanding helps remove imperfections such as brush strokes, dust, or rough patches and ensures better adhesion for subsequent layers; use fine-grit sandpaper typically in the 220 to 320 range and lightly sand the surface in a consistent direction, avoiding excessive pressure, then wipe away dust with a tack cloth or damp rag to create a clean base for the next coat.
For high-gloss work: for the final coat preparation sand using 400 grit for an ultra-smooth surface; for high-gloss finishes, some painters go as fine as 600 grit between coats. This step takes ten minutes but produces a finish that looks entirely different from work done without it.
After Sanding: Cleaning Is Critical
Use a tack cloth or damp cloth to remove any dust and debris before moving on to the next coat; tack cloth is best for solvent or oil-based finishes, because water can leave residue behind. Skipping the dust removal step is equivalent to sanding in the first place - grit particles trapped under a fresh coat create visible bumps and can disrupt adhesion in exactly the way you just worked to prevent.
Surface-Specific Paint Prep Sanding Strategies
Walls and Drywall
For drywall preparation and general wall work, 120 to 150 grit sandpaper strikes a good balance between removing flaws and avoiding deep scratches. The process follows a clear sequence:
- Clean the wall thoroughly and allow it to dry completely
- Patch holes and cracks with spackle or joint compound - apply the compound in thin layers using putty knives and scrapers, let each layer dry before applying the next, and feather the edges around the repair to create a smooth transition
- Sand patches flush with 120-grit, then finish with 150-grit
- Wipe down with a tack cloth
- Prime before painting
Proper paint prep helps your paint adhere better for a thicker, more durable coat that looks professional throughout the paint's service life.
Wood Surfaces and Trim
For wood trim, you may start with a coarser grit and finish with a finer one for smooth results. The most important rule on wood is grain direction. Sanding wood against the grain creates visible scratches and an uneven surface; always sand with the grain, especially on visible surfaces and furniture.
For previously painted trim in good condition, a 150-grit scuff-sand to dull the sheen is sufficient. For peeling or raw wood, step through 80, 120, then 180-grit before priming.
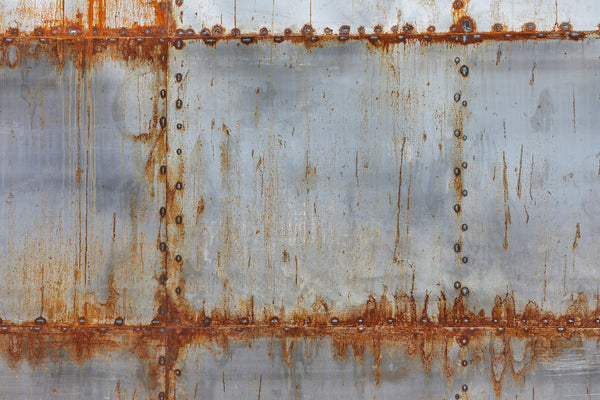
Metal Surfaces
Painting metal requires a clean smooth surface for the coating to adhere properly. Rust and oxidation are the main challenges. The sequence is: degrease first, then sand with 80-grit to remove rust, 120-grit to smooth, 220-grit for primer adhesion, and 400-grit for a paint-ready surface. Sanding smooths flaws and creates micro-abrasions that help primer and paint bond securely. Apply primer immediately after sanding - exposed metal begins to oxidize within hours.
Pro Tip: On metal, always use silicon carbide or zirconia alumina abrasives. Aluminum oxide is ideal for alloy steel and bronze, and emery is good for steel polishing or removing corrosion. Matching the abrasive mineral to the substrate cuts faster and lasts longer than using a general-purpose sheet.
Safety, Dust Control, and Lead Paint Compliance
Paint prep sanding generates more airborne debris than almost any other stage of a painting project. Treating safety as optional leads to long-term respiratory harm and, in older buildings, serious lead exposure risk.
Personal Protective Equipment
OSHA requires contractors on construction-related painting projects to use properly fitting Personal Protective Equipment following standards in 29 CFR 1926 covering eye protection, respiratory protection, head protection, and more.
For general sanding, a properly fitted N95 respirator is the minimum requirement. Always wear a dust mask to avoid inhaling fine dust particles which can harm your lungs; safety goggles are essential to protect your eyes from dust and debris; and use drop cloths to cover floors and furniture, keeping your workspace clean and reducing cleanup time.
OSHA's 2025 PPE Fit Rule mandates that all PPE must properly fit each worker, eliminating "one-size-fits-most" compliance gaps. This applies to every tradesperson on a job site, not just supervisors.
Lead Paint: A Non-Negotiable Safety Check
If your project involves a home or building built before 1978, lead paint is a real possibility. According to EPA and HUD data approximately 87% of homes built before 1940 contain lead-based paint, 69% of homes built between 1940 and 1960, and 24% of homes built between 1960 and 1978.
Common renovation activities like sanding, cutting, and demolition can create hazardous lead dust and chips by disturbing lead-based paint; to protect against this risk, the EPA issued a rule requiring the use of lead-safe practices, and beginning April 22, 2010, contractors performing renovation, repair, and painting projects that disturb lead-based paint in homes, child care facilities, and schools built before 1978 must be certified and must follow specific work practices to prevent lead contamination.
The EPA's Lead Renovation, Repair and Painting Program is the governing resource for compliance. The RRP Rule requires contractors to contain the work area with plastic sheeting and tape, post warning signs, prohibit open-flame burning and power tools without HEPA exhaust control, keep heat guns below 1,100 degrees Fahrenheit, perform thorough cleanup using HEPA vacuums and wet wiping, and complete a cleaning verification procedure using EPA-provided comparison cards.
Test before you sand. Lead test swabs are widely available and cost under $10. The cost of failing to test is measured in health damage, not dollars.

Common Paint Prep Sanding Mistakes (And How to Fix Them)
After years of watching projects go wrong, the same errors come up repeatedly. Knowing these in advance saves significant time and money.
Skipping Grit Steps
Jumping from a coarse grit straight to a fine grit leaves scratches that are hard to remove; always progress gradually, starting with medium grits and then moving to fine and super-fine grits. Each grit step removes the scratch marks left by the previous one. Skip a step, and those deeper scratches become permanent features of your finished wall.
Sanding Before the Surface Is Clean
One of the most common mistakes is skipping the cleaning step; dirt, dust, and grease can interfere with sanding and lead to poor results, so before you start sanding it is essential to clean your walls thoroughly. Sanding grit into embedded dirt contaminates the substrate and prevents the primer from bonding.
Using Too Much Pressure
Pushing too hard does not speed up sanding - it causes swirl marks and uneven wear; let the abrasive do the work. With a random orbital sander, the tool's own weight is close to the correct pressure. Adding force creates heat, which glazes surfaces and dulls grit fast.
Ignoring Dust Removal Between Steps
Dust can interfere with paint adhesion; always clean thoroughly after sanding. A quick wipe with a tack cloth takes two minutes and is one of the highest-return steps in the entire process. Skipping it traps sanding particles under the next coat.
Using Worn-Out Sandpaper
Old or clogged sandpaper will not cut efficiently and can burn or glaze surfaces; replace sheets regularly, especially when sanding tough materials like metal or paint. A new sheet of 120-grit cuts two to three times more efficiently than a worn one. Professionals change sheets frequently rather than working longer with a dull sheet.
Pro Tip: Tools like those found at professional-grade abrasive suppliers are designed for professional-grade results - the right abrasive makes all the difference. Cutting corners on abrasive quality adds time, not saves it.
Frequently Asked Questions
What grit sandpaper should I use for walls before painting?
For drywall preparation and general wall work, 120 to 150 grit sandpaper strikes a good balance between removing flaws and avoiding deep scratches. If you are working over patches or repaired areas, start with 100-grit to level the compound, then step up to 150-grit for your final smoothing pass before priming.
Do I need to sand between every coat of paint?
Sanding between coats of paint is not always necessary but can significantly enhance the smoothness and adhesion of the finish. For flat latex paints on walls, you can often get good results without intercoat sanding. However, for trim, cabinetry, high-gloss finishes, or any surface where appearance is critical, sand lightly with 220 to 320 grit after every coat except the last. Glossy paints in particular require extra sanding between coats to ensure adhesion.
Is wet sanding better than dry sanding for paint prep?
Neither method is universally better - they complement each other. Wet sanding typically offers a finer finish with minimal airborne dust, making it perfect for detailed work; dry sanding, in contrast, is faster and better suited for initial surface preparation. Use dry sanding for early-stage material removal and wet sanding for final finishing work. Always allow wet-sanded surfaces to dry fully before painting.
How do I know if a surface needs sanding or just cleaning?
In most cases, your initial sanding should take place after you have cleaned a given surface. After washing, run your hand over the surface. If it feels smooth and the existing paint is in good condition with no peeling, a light scuff-sand with 150-grit is sufficient. If you feel rough patches, texture differences, or the existing finish is glossy, more thorough sanding is required. Sanding walls before repainting is not necessary every time - but in certain situations it is essential; skipping sanding when it is needed can lead to peeling paint, poor adhesion, visible patchwork, and a rough or uneven finish, while unnecessary sanding can waste time, create dust, and even damage drywall.
What safety gear do I need for paint prep sanding?
At minimum: an N95 or P100 respirator, safety goggles, and drop cloths. Respirators fall under OSHA 1926.103 respiratory protection, requiring proper filtration for hazards like sanding dust, paint fumes, and solvents. If you are sanding in a home built before 1978, test for lead paint first and escalate to an N100 or P100 respirator if lead is present. Cover all furnishings and floors before you begin - sanding dust travels further than most people expect.
How long should I wait between coats before sanding?
Let paint dry completely and wait until the coat feels fully dry to the touch; for water-based paints this is usually 4 to 6 hours, for oil-based paints 12 to 24 hours. When in doubt, wait longer. Sanding semi-dry paint clumps the abrasive, tears the film, and forces you to start over. A reliable rule: if the surface feels even slightly cool or damp to the touch, it is not ready.
The Bottom Line on Paint Prep Sanding
Paint prep sanding is the stage that separates a finish that lasts a decade from one that starts peeling in eighteen months. The fundamentals are straightforward: clean the surface first, choose the right grit for the job, progress through grits methodically, sand between coats, remove all dust before re-coating, and never skip the safety steps. Sanding is a simple step that can save you time and money by preventing paint failures and improving the overall finish.
Whether you are preparing interior drywall, refinishing wood trim, or prepping metal for industrial coating, the techniques in this guide give you a repeatable process that produces professional results. The goal at Pro-Graad is to ensure that every professional has the abrasive tools to execute that process consistently - because the right preparation is the one thing no amount of premium paint can replace.
Sources
- Research and Markets 2023 Paint Defects Report - Paint defect statistics. Referenced via D&C Classic Garage
- Products Finishing - Poor Surface Preparation vs. Paint Adhesion - Industry adhesion data. https://www.pfonline.com/articles/poor-surface-preparation-vs-paint-adhesion
- Grokipedia - Paint Adhesion Testing - Adhesion science principles. https://grokipedia.com/page/Paint_adhesion_testing
- ECOS Paints - Sanding Before Painting - When and how to sand. https://ecospaints.net/blog/how-to-know-when-to-sand-before-painting
- Hyde Tools - Surface Preparation for Painting - Professional prep guide. https://hydetools.com/blogs/better-finish-blog/surface-preparation-for-painting
- Hyde Tools - Sanding Between Coats of Paint - Intercoat technique. https://hydetools.com/blogs/better-finish-blog/sanding-between-coats-of-paint
- WallMaster - Sanding Before Painting - Grit selection and technique. https://www.wallmasterllc.net/post/the-importance-of-sanding-before-painting-preparing-surfaces-for-painting
- Homestyler - When and How to Sand Before Painting - Surface-specific guidance. https://www.homestyler.com/article/mastering-when-and-how-to-sand-before-painting
- PMI Composites - Sandpaper Grit Guide - Full grit range chart. https://www.pmicomposites.com/sandpaper-grit-guide/
- True Value Hardware - Sandpaper Grit Buying Guide - Surface-specific grit selection. Aluminum oxide is ideal for alloy
- Professional Sandpaper - Sandpaper Grit Chart - Drywall and metal sequences. https://professionalsandpaper.com/sandpaper-grit-chart-for-floor-sanding/
- eQualle Sandpaper - Prepping Metal Before Painting - Metal grit sequence. https://equalle.com/blogs/metalwork-tips/equalle-sandpaper-sheets-for-prepping-metal-before-painting-80-400-grit-guide
- Paintman - Wet vs Dry Sanding - Method comparison. https://paintman.co.uk/help-and-info/wet-vs-dry-sanding-techniques-applications-best-practices/
- Engineer Fix - Dry vs Wet Sanding - Technical differences. https://engineerfix.com/dry-sanding-vs-wet-sanding-whats-the-difference/
- Eagle National Supply - Wet vs Dry Sanding a Car - Application scenarios. https://eaglenationalsupply.com/blogs/news/wet-sanding-vs-dry-sanding-a-car-which-should-you-choose
- eQualle - Sanding Between Paint Coats - Intercoat grit guide. https://equalle.com/blogs/finishing-tips/how-to-sand-between-paint-coats-for-a-professional-finish
- CyPaint - Mastering Between-Coat Finishes - Technique and grit. https://cypaint.com/article/how-to-sand-in-between-coats-of-paint
- Hyperfit Tools - How to Use an Orbital Sander - Power tool guide. https://www.hyperfit-tools.ca/blogs/tips-guides/how-to-use-an-orbital-sander-the-complete-professional-guide
- Heiler Painting - Importance of Surface Preparation - Professional prep overview. Skipping essential steps like
- Ellison Painting - Mistakes When Sanding Walls - Common error guide. https://www.ellisonpainting.com/blog/mistakes-sanding-walls-before-painting/
- eQualle - 5 Common Sanding Mistakes - Error prevention. https://equalle.com/blogs/sanding-tips/5-common-sanding-mistakes-and-how-to-avoid-them
- OSHA - Respiratory Protection Standard - 29 CFR 1910.134. https://www.osha.gov/laws-regs/regulations/standardnumber/1910/1910.134
- OSHA - Wood Dust Overview - Hazard guidance. https://www.osha.gov/wood-dust
- Wexford Insurance - OSHA Safety Gear for Painting Contractors - PPE compliance. https://www.wexfordins.com/post/osha-recommended-safety-gear-for-painting-contractors
- EPA - Lead Renovation, Repair and Painting Program - RRP Rule. https://www.epa.gov/lead/lead-renovation-repair-and-painting-program
- Environmental Training Center - EPA Lead Paint Standards - RRP certification requirements. https://www.environmentaltraining.com/lead-standards-epa
- Grit Insurance - EPA RRP Lead Paint Rules for Contractors - Compliance overview. https://gritinsurance.com/blog/epa-rrp-lead-paint-rules-painting-contractors