How to Sand Metal Without Scratching the Surface
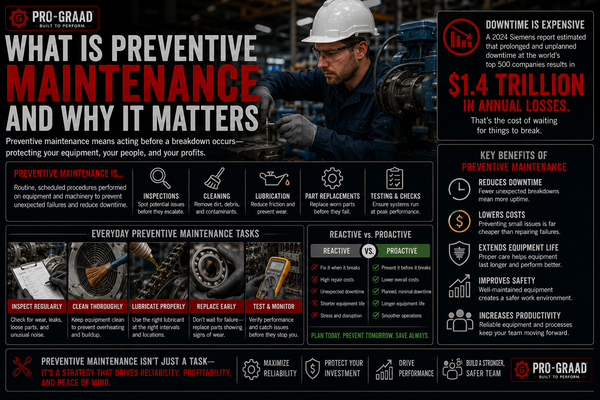
Scratches happen when someone grabs the wrong grit, skips a step, or bears down too hard. The fix is straightforward: clean the metal, choose the correct abrasive, work through a deliberate grit sequence, and keep your pressure light. In my experience, the single biggest time-waster in any metalworking project is undoing scratches that were entirely preventable in the first place.
Whether you are restoring a rusted garden gate, prepping a car panel for paint, or polishing a stainless steel countertop to a satin sheen, the fundamentals remain the same. The essentials are consistent across all metal sanding jobs: clean surface first, right abrasive for the metal type, correct grit sequence for the desired finish, and proper preparation before any coating goes on. This guide walks you through every stage in plain language so you can get a professional result, even on your first attempt.

Key Takeaways
-
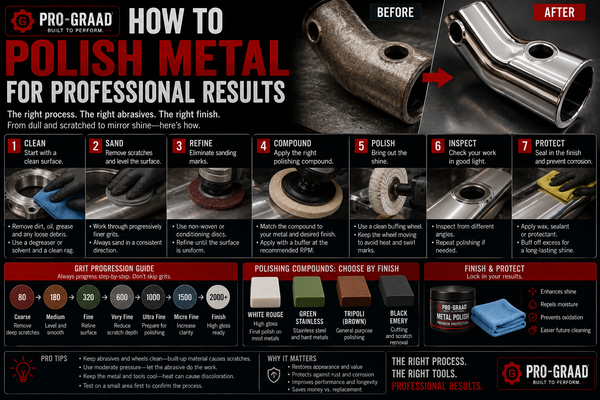
Grit sequence is non-negotiable: For metal sanding, match grit to the stage: 24-60 grit for heavy rust or stock removal, 80-120 grit to blend scratches and prep the surface, 150-220 grit to smooth before coating, and 320 grit and up (often wet) for polishing to a mirror finish. Jumping more than two grit levels at once leaves scratches that finer paper cannot efficiently remove.
-
Abrasive type matters as much as grit number: Step through the grits in order and match the abrasive to the metal: aluminum oxide for mild steel, zirconia or ceramic for stainless and hard alloys. Using the wrong abrasive means slower material removal and a rougher finish.
-
Light, even pressure wins every time: Pushing too hard does not speed up sanding; it causes swirl marks and uneven wear. Let the abrasive do the work. If you are pressing hard, the sandpaper is probably worn out and needs replacing.
-
Wet sanding prevents scratches on fine work: Wet sanding prevents overheating reduces dust production, and helps achieve a smoother finish. Switch to wet technique once you reach 320 grit or higher.
-
Safety gear is mandatory: Metalworking facilities that use processes like welding, thermal cutting, sanding, and polishing are at most risk because these processes send tiny metal particles into the air that can be toxic. Always wear a respirator, eye protection, and gloves before you begin.
Quick-Start Prioritization Framework
| Task | Best Starting Grit | Abrasive Type | Method |
|---|---|---|---|
| Heavy rust or paint removal | 60-80 | Aluminum oxide or zirconia | Dry |
| Smoothing welds or rough edges | 80-120 | Aluminum oxide | Dry |
| Prep for primer or paint | 150-220 | Aluminum oxide | Dry |
| Satin or brushed finish | 320-600 | Silicon carbide | Wet or dry |
| Mirror or high-polish finish | 600-2000+ | Silicon carbide | Wet |
| Aluminum or soft metal detail work | 120-240 | Stearated aluminum oxide | Wet |
Start here if you are:
- A first-time DIYer: Use the 80-120-220 three-step sequence on mild steel. It is forgiving, inexpensive, and teaches you how the grit progression actually feels.
- Prepping metal for paint: Stop at 220 grit, going finer than this actually reduces paint adhesion because the surface becomes too smooth to grip the primer.
- Chasing a mirror finish: Start at 320 grit and work up through 600, 1000, and 2000, wet sanding from 320 onward. Budget at least an hour per stage on a small panel.
Step 1, Prepare the Surface Before a Single Stroke
Surface prep determines 80 percent of your final result. Sanding over grease, oil, or loose debris forces those contaminants into the metal under pressure, causing scratches that no amount of fine-grit work will hide.
Clean and Degrease
Before sanding, ensure the metal surface is free of oil, dirt, and grease using a degreaser or a mix of water and mild detergent. This allows the sandpaper to make direct contact with the metal for more effective sanding. Dry the surface completely with a clean cloth before proceeding. Acetone or isopropyl alcohol works well for light contamination. For heavy grease, a dedicated metal degreaser applied with a clean rag is the more reliable choice.
Inspect for Damage
Inspect the entire surface for dents, deep scratches, or cracks. Pay extra attention to corners and welded joints, as those are weak spots that can hide damage. Repair cracks and fill pitting with an appropriate metal filler before sanding begins. Sanding over an unfilled crack widens it.
Pro Tip: Always test on an inconspicuous area or a scrap piece of the same metal before committing to your main surface. Different alloys and heat-treated metals respond differently to abrasion, and a quick test saves you from a costly mistake.
Step 2, Choose the Right Sandpaper for Your Metal
Abrasive Types Explained
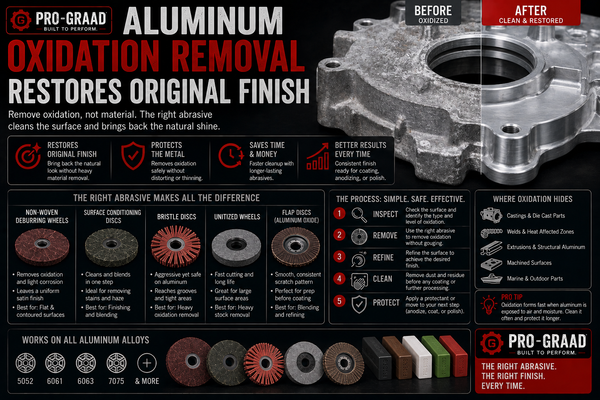
The grain material printed on the back of your sandpaper is at least as important as the grit number. Aluminum oxide sandpaper is one of the most versatile options for metal. It is highly effective for general-purpose metal sanding on soft metals like aluminum, copper, and brass.
For tougher jobs, silicon carbide sandpaper is a superior abrasive product designed for hard metals such as stainless steel and other tough alloys. Its sharper grains help cut more aggressively, making it ideal for heavy-duty tasks. It is also ideal for wet sanding, which helps reduce dust and heat buildup.
Ceramic alumina and zirconia alumina can do a better job than aluminum oxide at sanding steel. They produce less friction and have greater durability, but they cost significantly more. Reserve ceramic abrasives for professional or high-volume applications where longevity justifies the price.
Metal-Specific Abrasive Guide
According to Pro-Graad metal sanding guide, different metals demand specific approaches:
- Aluminum: A soft metal that clogs sandpaper easily. Use stearated aluminum oxide or silicon carbide to resist loading, and apply a light spray of water to reduce buildup.
- Steel and mild iron: Empire Abrasives' metal sanding guide work and zirconia or ceramic for heavy stock removal. Keep the sander moving to prevent overheating, and coat or paint the surface promptly after sanding to avoid flash rust.
- Stainless steel: Extremely tough and heat-sensitive. Use ceramic or zirconia abrasives and work in small sections to prevent heat buildup.
- Copper and brass: Empire Abrasives' metal sanding guide easily. Use fine-grit silicon carbide (220-600) and light pressure. Wet sanding prevents loading and streaking.

Step 3, Work Through the Grit Sequence Correctly
This is the stage where most scratches are either created or prevented. Grit selection is where most metal sanding jobs are won or lost. Pick a grit too coarse and you gouge the workpiece; too fine and you waste hours making no progress.
The Three-Stage Core Sequence
The Red Label Abrasives metal sanding guide outlines the standard progression most DIYers should follow:
- Stage 1 (60-80 grit): Heavy rust removal, old paint stripping, rough edge work.
- Stage 2 (120-180 grit): Blend the coarse scratches, smooth the surface, begin to even out imperfections.
- Stage 3 (220-240 grit): Final dry-sanding pass that leaves the metal ready for primer or a protective coating.
Never skip intermediate grits or jump more than two grit levels at once, as this leaves deep scratches that finer grits cannot remove efficiently. If you rush this step, you will spend far more time correcting the damage than the shortcut ever saved.
Sanding Motion and Pressure
For even sanding and to avoid leaving visible scratch marks, use circular or figure-eight motions, applying even pressure across the surface. This technique helps distribute the sanding evenly and minimizes the risk of over-sanding in one area.
To minimize scratching, apply even pressure and consider starting with higher-grit sandpaper if the metal surface is only mildly rough. Sanding in the direction of the grain also helps reduce the appearance of scratches.
When using power tools, keep the tool moving at all times to avoid creating deep scratches and heat spots. A sander held still in one spot for even two or three seconds can create a depression that is difficult to sand out.
Pro Tip: Between every grit change, wipe the entire metal surface with a clean, lint-free cloth or a tack rag. Dust and grit left on the surface can cause scratches during the next sanding stage. Always wipe with a tack cloth or damp rag between grit changes and before finishing.
Step 4, When and How to Wet Sand
Dry vs. Wet, Choosing the Right Method
When compared to wet sanding, dry sanding usually provides an aggressive material removal rate, which makes it ideal for projects requiring quick stock removal. Start your job dry and switch to wet once you reach the refinement stages.
Wet sanding prevents overheating reduces dust production, and helps achieve a smoother finish. If you need a very smooth finish, you want to reduce cleanup time, or you are working with heat-sensitive materials, it makes sense to add wet sanding to your process.
The Benchmark Abrasives wet vs. dry sanding comparison highlights one practical distinction worth noting: wet sanding is generally not recommended for active rust removal, as water can accelerate oxidation. Remove all rust with coarse dry paper before introducing water.
How to Wet Sand Metal
Empire Abrasives' metal sanding guide sandpaper, most commonly made with a silicon carbide abrasive grain. Lightly spray both the metal surface and the sandpaper with water. Use light, consistent pressure as you sand. Frequently wipe away the slurry (the mixture of water and fine metal particles) to check your progress and keep the surface clean.
For a mirror or high-polish finish, the eQualle sandpaper polishing guide recommends a four-step wet sequence: 400 grit to remove oxidation and tool marks, 800 grit to smooth coarse sanding lines, 1200 grit for a satin-like finish, and 2000 grit for a near-mirror result before buffing compound.
Pro Tip: Always sand in one consistent direction to avoid cross-patterns that show under reflected light. Always wet sand with stainless steel, heat buildup causes blue discoloration and uneven grain.
Step 5, Safety Practices You Cannot Skip
Sanding metal generates two hazards that beginners often underestimate: airborne metallic particles and sharp debris.
Respiratory and Eye Protection
Harmful particles are released when sanding metal. Do your sanding outside, or in an area with large windows. If neither is available, work with mechanical ventilation running and a dust extraction system attached to your sander.
According to AIHA's dust hazard guidance, metalworking processes like sanding send tiny metal particles into the air that can be toxic, especially when the facility handles iron oxide, lead oxide, manganese, nickel, and chromium. Always wear an N95 respirator at minimum for dry sanding, and upgrade to a P100 half-mask respirator when working with stainless steel or chrome-plated surfaces.

Protective gear must include gloves, safety glasses, and a dust mask as a baseline for any metal sanding task. Leather or cut-resistant gloves protect against sharp metal edges that appear as you remove surface material.
Common Mistakes That Cause Scratches (and How to Fix Them)
I have made every one of these errors at some point, and they all cost more time to fix than they saved.
Skipping Grits
When sanding metal, one of the most common mistakes that can ruin your project is skipping grits. Jumping from a coarse grit to a fine one without progressing through the intermediate stages can leave deep scratches that are difficult to remove. Always work your way through the grits gradually to achieve a smooth finish. The Painter Near Me metal prep guide adds that stopping at 80 grit leaves scratches so deep they telegraph through primer and paint, which means full rework.
Pressing Too Hard
Applying excessive pressure on the sandpaper leads to scratches, damaged surfaces, or ruined workpieces. Always apply even and light pressure for optimum results. If you feel the need to press harder to make progress, the sandpaper is clogged or worn out. Replace it.
Using the Wrong Abrasive for the Metal
Choosing the wrong abrasive for the metal type can result in inefficient sanding, scratches, or damage to the metal surface. Inappropriate abrasives reduce the quality of your finish. Match aluminum oxide to mild steel and copper, silicon carbide to stainless steel and fine finishing work, and ceramic or zirconia to heavy stock removal on hard alloys.
Not Cleaning Between Grits
Residual dust from coarser grits can scratch the surface when using finer grits. Always clean the surface thoroughly before moving on. A tack cloth or a lint-free rag dampened with water takes less than thirty seconds and prevents an hour of corrective sanding.
Frequently Asked Questions
What grit sandpaper should I start with for metal?
The correct starting grit depends entirely on the condition of the surface. For metal, you will generally start with a coarser grit (60-80) to remove rust, old paint, material, or rough edges. As you progress, move to medium grits (120-180) to smooth the surface, and then to finer grits (220-240) for the final touches. If the metal is already relatively smooth with only minor imperfections, you can skip the coarser stages and begin at 120 grit.
Can I sand metal by hand, or do I need a power sander?
Both methods work. For larger surfaces or more extensive work, a power sander can save time and effort. Orbital sanders are versatile and can be used for both coarse and fine sanding, while belt sanders are powerful and ideal for removing large amounts of material quickly. Hand sanding with a block gives you more control on curved sections, tight corners, and detailed areas where a machine would cause damage.
How do I sand metal without leaving visible scratches on a finished surface?
The key is working through a complete grit progression without skipping steps, and switching to wet sanding at 320 grit or higher. Empire Abrasives' metal sanding guide improves shine, and prepares metal for polishing. It reduces material removal and prevents abrasive loading by using water as a lubricant and flushing away debris. Finish with a metal polish or buffing compound to eliminate any remaining micro-scratches.
Do I need different sandpaper for aluminum versus steel?
Yes, the metal type matters significantly. Aluminum is soft and prone to scratching, so use finer grits and less pressure. Start with a medium grit (120-150) and progress to a fine grit (220-240) for finishing. Wet sanding is particularly effective with aluminum to avoid overheating and warping. Steel can tolerate coarser starting grits and more aggressive pressure, but stainless steel requires heat control and dedicated abrasives to avoid discoloration.
Is it safe to sand metal indoors?
It can be done safely if ventilation is adequate, but it carries real risks. Aluminum dust, common in grinding sanding, and finishing, is often treated with extra caution due to combustibility considerations. Ferrous dust from iron and steel can be abrasive and persistent, and fine metal particulates can be a respiratory concern. At minimum, open windows, use a dust extraction system, and wear an N95 respirator. Never sand metal near an open flame or heat source.
The Bottom Line
Scratch-free metal sanding comes down to preparation, patience, and the right sequence. Clean the surface thoroughly, match your abrasive type to the metal, work through each grit stage without skipping, clean between passes, and switch to wet sanding for final refinement. A light, consistent touch will always outperform brute force.
If you are sourcing abrasives for your next project, Pro-Graad offers a range of metal-grade sanding products suited to both DIY and professional applications, worth browsing before you start your next job.
Sources
-
Metal Sanding 101: How to Properly Sand Metal, Red Label Abrasives. Complete grit sequence and technique guide for metal surfaces. https://www.redlabelabrasives.com/blogs/news/metal-sanding-101-how-to-properly-sand-metal
-
Your Ultimate Guide to Sanding Metal, Empire Abrasives. Covers metal-specific techniques, wet sanding, and common mistakes. Empire Abrasives' metal sanding guide
-
How to Choose the Right Grit for Metal Sanding Projects, Benchmark Abrasives. Comprehensive grit selection chart and abrasive matching guide. https://benchmarkabrasives.com/blogs/selecting-tools/how-to-choose-the-right-grit-for-metal-sanding-projects
-
How to Sand Stainless Steel Without Scratches or Heat Discoloration, eQualle Sandpaper. Stainless-specific technique using silicon carbide wet/dry paper. https://equalle.com/blogs/woodworking/how-to-sand-stainless-steel-without-scratches-or-heat-discoloration
-
eQualle Sandpaper Sheets for Metal Polishing (400-2000 Grit Guide), eQualle. Wet sanding sequence for mirror finishes. https://equalle.com/blogs/surface-prep/equalle-sandpaper-sheets-for-metal-polishing-400-2000-grit-guide
-
Complete Guide to Sanding Metal Before Painting, Painter Near Me. Grit progression for paint adhesion and common mistakes. https://www.painternearme.com/specialty-painting/painting-metal-surfaces/sanding-metal-before-painting
-
Wet Sanding vs Dry Sanding, Benchmark Abrasives. Comparison of methods, benefits, and when to use each. https://benchmarkabrasives.com/blogs/sanding/wet-sanding-vs-dry-sanding
-
Best Sandpaper for Metal: Guide to Grits, Types and Techniques, Benchmark Abrasives. Abrasive grain types and their applications on different metals. https://benchmarkabrasives.com/blogs/sanding/best-sandpaper-for-metal
-
5 Common Sanding Mistakes and How to Avoid Them, eQualle Sandpaper. Pressure, clogging, and cleaning errors. https://equalle.com/blogs/sanding-tips/5-common-sanding-mistakes-and-how-to-avoid-them
-
Frequently Asked Questions About Controlling Dangerous Dusts, AIHA. Metal dust health and safety information. https://www.aiha.org/blog/frequently-asked-questions-about-controlling-dangerous-dusts
-
Silicon Carbide vs Aluminum Oxide Abrasives, Empire Abrasives. Technical comparison of abrasive grain types for metal work. Ceramic alumina and zirconia
-
How to Sand Metal for Painting or Polishing, eQualle Sandpaper. Step-by-step guide using 80-600 grit sequence. https://equalle.com/blogs/safety-and-gear/how-to-sand-metal-for-painting-or-polishing-80-180-320-600-grit-step-by-step-guide
-
Top Things to Avoid When Sanding, Dremel. Pressure, ventilation, and safety guidance for sanding metal and other materials. https://www.dremel.com/us/en/projects/project-plans/top-things-to-avoid-when-sanding