How to Polish Metal for Professional Results
Transforming a dull, scratched piece of metal into a brilliant, mirror-like surface is one of the most satisfying projects a DIYer or hobbyist can tackle. To polish metal effectively, the basic process involves cleaning the surface thoroughly, working through progressively finer sandpaper grits, applying the right polishing compound, and then protecting the finished surface with a wax or sealant.
Proper metal polishing goes well beyond aesthetics; it can restore functionality, protect against corrosion, and substantially extend the life of metal objects, whether you're working on a prized antique or want to shine up a household item. In fact, the global metal polishing compound market was valued at $9.36 billion in 2025, reflecting just how central this skill is across industries from automotive to aerospace. That figure is a signal: if professionals invest at this scale to maintain metal surfaces, the techniques they use are worth learning at home.
This guide walks you through every step, from prep and grit selection to compound choice and final protection, so you can achieve results that look genuinely professional.
Key Takeaways
-
Surface preparation is non-negotiable: Preparing the metal surface before polishing is a crucial step that ensures the success of the process. Dirt, grease, and oxidation act as barriers between the abrasive and the metal surface, preventing the abrasive from effectively removing imperfections. Always clean before you abrade.
-
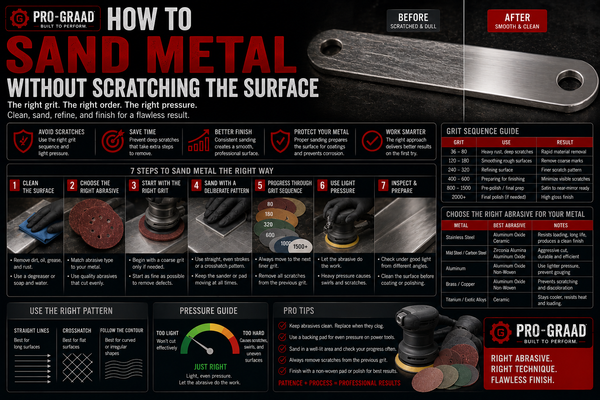
Grit progression determines your finish: Match grit to the stage: 24-60 for heavy rust or paint removal, 80-120 to blend scratches and prep the surface, 150-220 to smooth before coating, and 320 and up (often wet) for polishing to a mirror finish. Skipping grits ruins the result.
-
Compound choice must match your metal: Brown Tripoli compound is used to polish softer metals including silver, brass, copper, and aluminum, while white polishing compound is used to polish harder metals like stainless steel and chrome- or nickel-plated surfaces. Using the wrong compound for the wrong metal wastes time and risks damage.
-
Light pressure beats heavy pressure every time: Excessive pressure generates heat which can burn or warp the metal, especially on thin parts, and it does not speed up the process; it just causes damage. Let the abrasive do the work.
-
Protection locks in your results: One major oversight is failing to protect surfaces after polishing. Polishing removes some layers of protection and exposes surfaces that may be susceptible to damage from environmental factors like UV rays or moisture. Always finish with a wax or sealant.
Quick-Start Prioritization Framework
| Scenario | Recommended Starting Point | Grit / Compound | Time to Results |
|---|---|---|---|
| Light tarnish or oxidation only | Skip to compound stage | Fine compound + microfiber | 15-30 minutes |
| Surface scratches and dull finish | Medium grit sanding, then compound | 220 grit, then Tripoli | 45-90 minutes |
| Heavy rust, deep scratches | Coarse sanding first | 60-80 grit, progress to 320+ | 2-4 hours |
| Soft metal (aluminum, brass, copper) | Brown Tripoli compound | Sisal wheel + brown Tripoli | 30-60 minutes |
| Hard metal (stainless steel) | Coarser cut, then white compound | 80 to 320+ grit, white/green compound | 1-3 hours |
| Mirror finish goal | Full progression required | 400-2000 grit wet sand + rouge | 3+ hours |
Start here if you're:
- A complete beginner with light tarnish: Start at the compound stage with a soft cloth and a light-duty polish; you may not need sandpaper at all.
- Working on stainless steel or hard alloys: Start with 80-grit zirconia or ceramic sandpaper and commit to the full grit progression.
- Tackling automotive or decorative chrome: Use a fine polishing compound rated for chrome and avoid any abrasives coarser than 400 grit on the final surface.
Step 1, Clean and Inspect the Metal
First things first: no polishing technique compensates for a dirty surface. Polishing a dirty surface is the fastest way to create scratches. Any dust, grit, or residue will be ground into the metal by the polishing wheel, causing more harm than good.
How to Clean Before Polishing
Clean your workpiece thoroughly. Wipe off any dirt, grease, or other contaminants with soapy water and a clean cloth. Rinse with lukewarm water and dry it thoroughly. For greasy surfaces, engine parts, kitchen fixtures, workshop tools, use a degreaser such as acetone or denatured alcohol. Degreasing removes any grease or oil that may be present, and this can be done with a degreasing agent such as acetone or denatured alcohol.
Evaluating the Surface Condition
After cleaning, carefully inspect the surface for any imperfections. Are there deep scratches, oxidation, or simply a dull surface? This evaluation will determine your starting point. In my experience, holding the surface at a low angle under a workshop light is the fastest way to reveal scratches that look invisible under overhead lighting. Angled lighting reveals surface defects that overhead lighting hides, position a work lamp at about 30 degrees to the surface, and scratches and uneven areas become immediately visible.
Pro Tip: Before you begin polishing any unfamiliar metal, every material has different properties and will buff differently. Practice on a piece of scrap to familiarize yourself with the material and how it responds to polishing. This one step saves hours of remediation work.
Step 2, Choose the Best Metal Sandpaper and Work Through the Grits
This is where most beginners go wrong. They grab whatever sandpaper is on the shelf, scratch the surface deeply, and then wonder why their polishing compound cannot bring back the shine. Grit selection is a science, and the Pro-Graad grit selection guide explains it clearly: grit selection is where most metal sanding jobs are won or lost. Pick a grit too coarse and you gouge the workpiece; too fine and you waste hours making no progress.
Understanding Grit Ranges for Metal
For removing a large amount of material and initial sanding, use coarser grits such as 40 or 80. These grits are useful for rust removal and initial surface preparation; they help quickly eliminate imperfections or rough spots on metal surfaces.
Medium grit sandpaper, between 100 and 150, is perfect for overall sanding and refining rough surfaces. It helps smooth out the uneven areas left after using coarser grits and is perfect for surface preparation before applying finishing coats, helping to reduce visible scratches.
Ultra-fine grit (400+) is used for polishing and finishing metal, ensuring a mirror-like surface free of scratches. For a true mirror result, keep going: for a mirror-like finish, go even finer (800-1000 grit or more). Wet sanding with wet and dry sandpaper will help achieve the smoothest finish by reducing the chances of clogging the abrasive surface.
Choosing the Best Metal Sandpaper by Type
The abrasive material matters as much as the number on the package. According to the Red Label Abrasives sandpaper guide:
- When polishing metal, fine or ultra-fine grit (P240 and up) aluminum oxide or silicon carbide sandpaper is recommended. Aluminum oxide is the preferred option for polishing hard metals like iron and steel, while silicon carbide is better suited for softer metals and final-stage polishing.
- Zirconia alumina is designed for heavy material removal. Because of its high durability and self-sharpening properties, it is the best choice for hard metals like stainless steel or structural steel.
Never Skip Grits
Don't jump from 220 directly to 1000 grit; it will fail. You must gradually step up. Skipping grits leaves "orphan scratches", deep valleys hiding under a polished surface. A safe rule is increasing your grit by no more than 50% to 100% per step. The Orobrush metal grit guide is a helpful reference for building out your progression sequence.

Step 3, Apply the Right Polishing Compound
Once sanding is complete and the surface looks uniformly smooth under angled lighting, it's time to apply a polishing compound. The best metal polish for your project depends entirely on the metal type and the finish you want.
Understanding Compound Types
According to Pro-Graad polishing compound guide, there are three types of polishing compounds: Tripolis (called cutting compounds), which are used to cut and color most soft metals like copper, brass, aluminum, and tin; intermediates; and finishing rouges.
Here is how each category maps to real-world use, per the Industrial Polishing Services compound guide:
- Brown Tripoli works well on softer metals like copper, brass, and aluminum.
- White compound is reserved primarily for hard metals and stainless steel, offering a finer composition that cuts down rough surfaces in the intermediate stage of polishing.
- Green compound mainly finishes stainless steel materials. It will remove scratches and leave behind a mirror-like finish.
- White rouge compound functions as a fine abrasive that produces exceptional mirror reflections and is used in the final stage on soft metal items including gold and silver.
How to Apply Compound Correctly
Many users mistakenly apply too much polishing compound thinking it will yield better results. Using excessive amounts creates a mess and makes it harder to achieve the desired shine. Instead, apply a small amount, usually around the size of a quarter, to your pad and add more only if necessary.
every material has different RPM or less. Working at a higher rate will overheat the work surface and prevent the compound from working properly. Slight pressure works best, let the coated buff do the work for you.
Pro Tip: every material has different the material as you polish, metal should produce black soot. This is normal and is actually evidence the compound is cutting correctly. Wipe it away with a clean microfiber cloth between stages.
Step 4, Hand Polishing vs. Machine Polishing
I've found that choosing between hand polishing and power tools comes down to two factors: the size of the piece and the depth of imperfection you need to correct.
Hand Polishing
Polishing metal by hand is the best way to get a mirror finish without taking it to a detailer. While this process is a little more time consuming and tedious, the final result is worth it. For small items like jewelry, cutlery, and hardware, hand polishing gives you maximum control.
The polish should be left on for about a minute before wiping it off with a damp microfiber cloth. For heavily tarnished objects, you can wait longer, about three to five minutes. Finally, rinse the metal with warm water and dry it off completely.
Machine Polishing
To be more efficient and enhance quality, the rubbing motion during polishing is usually done by mechanical methods. One way is to mount a polishing disc to a handheld power tool like a drill or angle grinder. Another way is to use a belt sanding machine.
For machine work, always secure your workpiece first. A piece that slips during buffing can catch the wheel and become a projectile. Use vises with soft jaws, clamps with protective pads, or custom fixtures.
Step 5, Protect the Finish After Polishing
This step separates a result that lasts weeks from one that lasts years. Beyond polishing, metal wax acts as a crucial protective barrier against moisture, chemicals, UV radiation, and contaminants that can lead to corrosion, rust, and discoloration. This protection is essential for extending the lifespan and maintaining the aesthetic appeal of metal objects.
How to Apply a Protective Coat
Use a clean, soft cloth and a gentle cleaner (like isopropyl alcohol) to remove any lingering compound residue or fingerprints. Apply a thin, even coat of metal wax or a clear sealant, this barrier helps prevent oxidation and tarnishing.
For outdoor or high-humidity environments, the frequency of applying a protective coating depends on the environment and usage. In harsh environments, consider reapplying every 3-6 months. For indoor applications, once a year may suffice.
Pro Tip: Regular polishing every few months keeps your metal items looking their best and prevents tarnish buildup. If you maintain metal proactively, you rarely need to repeat the full grit progression, a quick buff with a light compound and a fresh wax coat is all it takes.
Common Mistakes That Ruin a Polish Job
Even experienced DIYers make these errors. Knowing them in advance saves you from starting over.
Using the Wrong Abrasive for the Metal
The idea of a singular product universally excelling across the diverse spectrum of metallic alloys is impossible, as each material possesses unique properties that dictate the appropriate treatment. A formulation ideal for removing heavy oxidation from unlacquered brass would likely be too abrasive for delicate silver plating or polished aluminum, potentially causing irreparable damage.
The fix: always match your compound to the metal type before you begin. Test on an inconspicuous area first.
Applying Too Much Pressure
One of the most common mistakes beginners make is pressing too hard. Excessive pressure damages the metal and generates unnecessary heat, which can discolor the surface. If you are working with a power tool, reduce your pressure to the point where the tool is doing the work and your hand is simply guiding it.
Skipping Safety Precautions
Relevant OSHA standards for polishing and buffing operations include 1910.94(b) (ventilation), 1910.133 (eye protection), 1910.138 (hand protection), and 1910.134 (respiratory protection). At minimum, wear ANSI Z87.1 safety glasses, work gloves, and use a dust mask or respirator. Work in a well-ventilated area to avoid inhaling potentially toxic fumes.
Failing to Use Wet Sanding at Fine Grits
Dry sanding works for rough metal but fine finishes demand liquid. Wet sanding flushes away loose metal particles, prevents the abrasive from clogging, and dissipates dangerous heat buildup. Switch to wet sanding at 400 grit and above for the best results on any mirror-finish project.
Frequently Asked Questions
What is the best metal polish for general use?
The best metal polish depends on your target metal. Metal polishes are commonly used on materials such as stainless steel, aluminum, brass, copper, and chrome. They work by removing tarnish, oxidation, and surface blemishes, resulting in a smooth and bright finish. For a versatile, multi-metal option, products like Flitz Multi-Purpose Polish handle a wide range of surfaces. For aluminum specifically, Mothers Mag and Aluminum Polish has been a trusted favorite for years, especially for aluminum; you can use it on wheels, trim, and even around the house.
What sandpaper grit should I start with for metal polishing?
It depends on the condition of your surface. For severe scratches or oxidation you need to start with coarser grit sandpaper or a harder abrasive wheel. For example, if your surface has deep scratches, you might begin with 80-grit or 120-grit. For a surface that is already reasonably smooth but just dull, start at 220 grit and work upward.
Can I polish stainless steel at home?
Yes. Stainless steel requires ceramic sandpaper or zirconia. Start with 80 grit and progress to 320+ for a polished look. From there, if you are polishing stainless steel, you may need to progress up to 600, 1000, or even 2000+ grit. Wet sanding is often employed here to keep the abrasive clean and prevent dust, resulting in an exceptionally smoother finish that is free of visible scratches.
How do I prevent scratches during polishing?
Micro-scratches are small scratches that can form on the surface during polishing. They are typically caused by abrasive particles, worn-out polishing pads, or improper machine settings. Replace pads and polishing cloths regularly, never skip grit stages, and always wipe the surface clean between each stage to prevent loose abrasive particles from transferring to the next step.
How often should I polish metal?
Regular polishing every few months keeps your metal items looking their best and prevents tarnish buildup. Items exposed to moisture, salt air, or UV light, such as outdoor fixtures, marine hardware, or automotive trim, benefit from a light polish and protective wax reapplication every two to three months. Indoor pieces in controlled environments may only need attention once or twice per year.
Take the Next Step with Pro-Graad
Whether you are restoring an old tool, finishing a custom fabrication, or maintaining automotive metalwork, the techniques above give you a proven, repeatable process. For premium abrasive products matched to each stage of the grit progression, from aggressive material removal through to ultra-fine finishing, Pro-Graad offers a professional-grade range built for real results. The right abrasive at each stage shortens your time on the job and raises your finished quality.
Sources
-
How to Polish Metal: Complete Guide, Benchmark Abrasives. Step-by-step polishing process and grit selection. https://benchmarkabrasives.com/blogs/how-to-guides/how-to-polish-metal
-
How to Choose the Right Grit for Metal Sanding Projects, Benchmark Abrasives. Grit range guide for metal finishing. https://benchmarkabrasives.com/blogs/selecting-tools/how-to-choose-the-right-grit-for-metal-sanding-projects
-
The Best Sandpaper for Metal, Choosing the Right Grain, Red Label Abrasives. Abrasive material comparison for metalworking. https://www.redlabelabrasives.com/blogs/news/the-best-sandpaper-for-metal-choosing-the-right-grain
-
Choose the Right Sandpaper Grit for Metal Polishing, Orobrush. Grit progression and wet sanding guide. https://www.orobrush.com/blog/choose-the-right-sandpaper-grit-for-metal-polishing_b0040.html
-
What Grit Sandpaper for Metal?, FastPlus. Sandpaper grit categories and mirror finish guidance. https://fastplus.eu/blogs/sanding-polishing/sandpaper-grit-for-metal
-
Polishing Compounds Explained: Advantages and Types, Benchmark Abrasives. Compound types and their applications. https://benchmarkabrasives.com/blogs/news/guide-to-polishing-compounds-and-their-uses
-
Polishing Compounds and Their Uses, Industrial Polishing Services. Color-coded compound guide by metal type. https://ipsfinishing.com/2020/09/your-guide-to-metal-polishing-compounds/
-
Polishing Compounds and Their Uses, CMP Industries. Compound color chart and metal compatibility. https://www.cmpionline.com/polishing-compounds-and-their-uses
-
Common Metal Polishing Mistakes and How to Avoid Them, PAVCO. Expert pitfall guide for professional polishing. https://pavco.com/blog/metal-polishing-mistakes
-
Detailed Polishing Instructions for Metal and Plastics, Enkay Tool. Speed, pressure, and compound application guidance. every material has different
-
Metal Wax for Protection, Polishing and Anti-Corrosion, SER Wax Industry. Protective wax application and maintenance guidance. https://www.serwax.com/blog/metal-wax
-
Common Mistakes to Avoid When Polishing Metal Surfaces, Reference.com. Compound application errors and protective finishing. Many users mistakenly apply too
-
Metal Polishing Compound Market, Stellar Market Research. Market size and aluminium oxide segment data for 2025. https://www.stellarmr.com/report/metal-polishing-compound-market/2485
-
OSHA PPE Requirements for Abrasive Tools, Empire Abrasives. Regulatory requirements for eye, hand, and respiratory protection. OSHA PPE requirements for abrasive tools
-
Metal Polish Winners: 5 Best Picks for 2025, Meitai. Top-rated polish products and application tips. https://www.meitaisprayer.com/blogs/knowledge/metal-polish-winners-5-best-picks-for-2025-top-products
-
How to Protect Polished Mild Steel, BJ Products. Coating frequency and maintenance schedules. https://bjproducts.net/how-to-protect-polished-mild-steel/
-
How to Restore Shine and Protect Metal, The Jimboslice Workshop. Post-polish cleanup and sealant application. https://thejimbosliceworkshop.com/how-to-polish-metal/