Finishing Discs Perfect Final Surface Preparation
The difference between a surface that looks "good enough" and one that looks genuinely professional almost always comes down to what happened before the coating went on. Surface preparation directly impacts adhesion, durability, and corrosion resistance, and even the highest-quality coatings can fail prematurely if applied to poorly prepared surfaces. Finishing discs are the tools that bridge the gap between raw material and a flawless final result, yet they are routinely underestimated, mismatched, or skipped altogether.
Whether you are prepping wood for stain, metal for paint, or stone for polish, understanding how finishing discs work, and which one to reach for at each stage, is the single most impactful skill you can develop. Grit size determines how aggressively a disc cuts and what finish it leaves behind, and choosing the wrong grit is one of the most common and costly mistakes in surface finishing. This guide gives you a clear, practical framework for making the right call every time.
Key Takeaways
- Grit progression is non-negotiable: Skipping grits results in an uneven surface with visible scratches that show up in the final finish, always move progressively through grit levels to ensure a smooth, consistent result. Therefore, plan your sequence before you start and commit to it.
- Disc material matters as much as grit: Grit size is only half the equation, the grain type determines the disc's durability and heat resistance. Match your grain to your substrate to avoid wasted discs and ruined workpieces.
- Surface prep failures start before the first coat: Residual contamination from oil dirt, or rust reduces coating adhesion, and coatings also need a specific roughness to bond effectively, too smooth or too rough can compromise results. Therefore, always clean the surface before touching a disc to it.
- Correct technique extends disc life dramatically: Three common workshop mistakes can reduce disc lifespan by up to 40%, these include the wrong angle, excessive pressure, and neglecting to replace worn discs promptly.
- Tool-to-disc compatibility is a safety issue: One of the most critical selection factors is matching your disc to your workpiece material, because using the wrong abrasive can result in poor cutting performance, heat damage, contamination, or even dangerous conditions.
Quick-Start Prioritization Framework
| Strategy | Best For | Effort Level | Time to Results |
|---|---|---|---|
| Hook-and-loop random orbital discs | Wood, furniture, painted panels | Low | Minutes per stage |
| PSA fiber resin discs | Metal fabrication, weld blending | Medium | 15-30 min per step |
| Flap discs (Type 27 flat) | Flat metal surfaces, blending | Medium | 30-60 min |
| Non-woven conditioning discs | Surface cleaning, deburring, final metal sheen | Low-Medium | 10-20 min |
| Diamond polishing pads | Granite, stone, concrete | High | Multiple passes |
| Ceramic grain finishing discs | Stainless steel, high-alloy metals | Medium-High | Multiple stages |
Start here if you are:
- A homeowner or hobbyist: Hook-and-loop paper-backed discs on a random orbital sander give you the lowest learning curve and the most forgiving results on wood and painted surfaces.
- A fabricator or metalworker: Flap discs paired with the correct grain type (ceramic for stainless, zirconia for carbon steel) deliver the fastest route from weld grind to paint-ready.
- Working with stone or concrete: Diamond polishing pads are the industry standard, conventional abrasives wear out too quickly and cost more in the long run.
Understanding Finishing Disc Types and What Each One Does
Coated Sanding Discs
One of the most critical selection discs designed primarily for surface preparation, smoothing, and finishing. They attach to orbital sanders, random orbital sanders, or backing pads on grinders, and come in paper, cloth, or film backing. Sanding discs range from coarse grits (40-60) for aggressive material removal to ultra-fine grits (320-1000+) for finishing and polishing.
For most general projects, these are the workhorses of final surface preparation. Fine grits smooth surfaces ahead of a final finish, at this stage, visible scratches disappear and the surface starts to take on a uniform appearance, making this stage essential before applying paint, varnish, or any coating where surface texture will show through. The practical takeaway: never stop at a grit that still leaves visible marks.
Pro Tip: Apply light pressure and let the tool do the work will clog the abrasive disc, let the weight of the tool provide the right amount of pressure. Forcing a disc shortens its life and burns the surface.
Flap Discs
The flap disc has revolutionized weld finishing by allowing grinding and polishing in a single step. Being composed of overlapping abrasive cloth flaps, it provides a cushioning effect that reduces vibration and noise. Two profiles dominate the market. Type 27 (flat) flaps are completely flat, engineered for blending, finishing, and polishing flat surfaces, and are best used at a low angle of 0 to 15 degrees to create a smooth, consistent finish without gouging the workpiece.
Research in abrasive technology indicates that using a "two-step" process, starting with 40-grit and finishing with 80-grit, reduces total labor time by up to 30% compared to using a single medium grit for the entire task. That 30% time saving translates directly to lower job costs, so adopting a deliberate two-step approach pays for itself quickly.
Non-Woven Conditioning Discs
One of the most critical selection matrix. Coated discs excel at material removal and defined surface finishes, while non-woven discs excel at surface conditioning, cleaning, and producing consistent fine finishes without removing much metal. These are the quiet achievers of the finishing disc family, ideal when you need a consistent surface sheen on metal without risking dimensional loss.
Fiber Resin Discs
While fiber discs are renowned for their aggressive material removal capabilities, they are also exceptionally effective tools for achieving a flawless, uniform finish. However, bridging the gap between aggressive grinding and fine finishing requires technique, knowledge, and the right tools. In practice, fiber discs are the go-to choice for metal fabrication environments where speed and finish quality both matter.
Choosing the Right Grit for Finishing Work
The Grit Progression System
Grit is the number of abrasive particles per square inch on the backing material, and this mathematical relationship dictates how the disc will interact with the material. The rule of thumb is simple: lower grit numbers mean larger abrasive particles, and because these particles are bigger, they create a more aggressive cutting action.
Start with coarse grit (24-60) for heavy material removal, move to medium grit (80-120) for general preparation, use fine grit (150-220) for pre-finish smoothing, and finish with extra fine (320+) for polishing, and progress through grits sequentially rather than skipping stages. Think of each stage as doing the hard work for the next one. Skipping a stage means the following grit has to do double the work and will never fully catch up.
Grit Recommendations by Material
For wood: Apply light pressure and let the tool do the work and alder, start with 120-grit abrasive and finish with no finer than 220-grit for water-based stains and 180-grit for oil-based stains. Going finer on softwoods can actually burnish the grain closed and prevent stain penetration, so finer is not always better.
For metal: As you move into finer grits, the goal shifts from removal to refinement. 220-grit is used for final sanding to clear scratches and prepare metal for primer or a brushed finish, which is especially important for stainless steel, where you want a finer finish that looks uniform.
For stone: Medium grits refine the surface and erase the scratches left behind by coarser pads, the 400-800 range smooths the stone and prepares it for the final polishing stages, at which point the granite starts to look more uniform. Skipping this middle range is a common shortcut that ruins finishes.
Pro Tip: Use 40-grit for heavy weld removal, 60-grit for edge chamfering and blending, and 80 to 120-grit for final surface finishing. Keeping a set of clearly labeled discs for each stage prevents mix-ups mid-job.

Matching Disc Grain to Your Material
Aluminum Oxide: The Versatile Standard
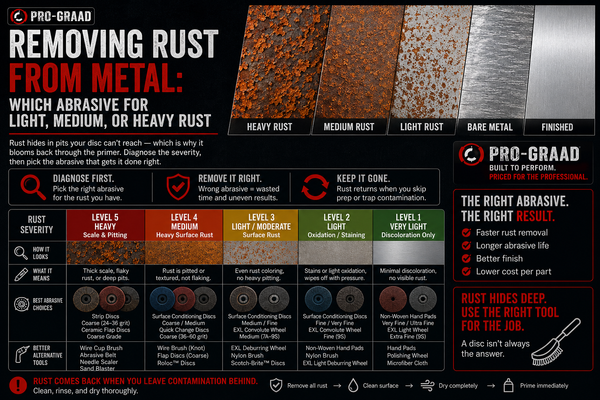
Aluminum oxide is a tough, durable material that self-sharpens as it wears, extending its lifespan. Available in various grit sizes, these discs are excellent for a wide range of applications, from removing rust to sanding wood surfaces, and they offer a cost-effective solution for most general sanding tasks. For most homeowners and light-production workshops, aluminum oxide is the sensible default.
Zirconia Alumina: The Metalworking Workhorse
Zirconia alumina is the industry workhorse for carbon steel and heavy-duty metal grinding. One of the most critical selection significantly longer life on hard metals due to their self-sharpening fracture pattern. If you are grinding structural steel, weld beads, or fabricated components regularly, zirconia is the upgrade that cuts your consumable spend.
Ceramic Alumina: High-Performance Finishing
Ceramic alumina features self-sharpening grains that excel in high-pressure stainless steel applications. The ceramic flap disc is the superior choice for fine finishing, its self-sharpening microcrystalline ceramic grain cuts cooler than traditional zirconia, drastically reducing the risk of burn marks on the workpiece and minimizing subsequent passivation times.
Stainless steel deserves particular attention: never use a flap disc on stainless steel if it has previously been used on carbon steel. The disc will embed microscopic carbon particles into the stainless, which will cause it to rust. Always keep dedicated, clearly marked ceramic or zirconia discs strictly for stainless steel work.
Silicon Carbide: Fine Work and Non-Ferrous Metals
Silicon carbide discs are typically reserved for a finer finish or specialty applications. Silicon carbide is sharp but brittle, making it perfect for non-ferrous soft metals and final polishing stages. It is also the preferred grain for hardwoods, where it produces a notably clean surface before finishing.
Backing Systems: Hook-and-Loop vs. PSA vs. Fiber
Hook-and-Loop (Velcro) Discs
Hook-and-loop and PSA discs are the most widely used sanding discs for sander applications. They offer fast changeovers, consistent performance, and are available in a full range of grits for tasks from surface preparation through final finishing. Hook-and-loop wins in environments where you switch grits frequently, a key advantage for multi-stage finishing work.
The random orbital sander is the most common of these finishing sanders because it can extract dust if using a vacuum pattern and can give a balance of light stock removal and finishing with one tool. Pairing a quality hook-and-loop disc with a random orbital sander and a dust extraction system is the setup that Pro-Graad customers consistently report as their most-used combination for precision surface finishing.
PSA (Pressure-Sensitive Adhesive) Discs
PSA discs use a peel-and-stick adhesive backing that bonds directly to the sanding pad. They are fast to swap out, cost-effective for high-volume production work, and available in a wide range of grits, common in woodworking shops, auto body refinishing, and general surface finishing projects, and well suited to environments where discs are changed frequently throughout a shift.
The one trade-off: self-adhesive sanding discs work best when used at the right speed and pressure, running them too fast causes overheating, leading to premature wear and uneven sanding. Therefore, always confirm your tool's speed setting before starting.
Pro Tip: Using the correct sanding pad with the right hole pattern is crucial for effective dust extraction, which extends disc life and improves the quality of your finish. Mismatched hole patterns block airflow and cause premature disc loading.
Fiber Resin Discs
Fiber resin discs are heavy-duty resin-bonded discs used for aggressive stock removal, weld blending, and surface conditioning on metal. They are typically made with aluminum oxide or zirconia alumina on a thick fiberglass-reinforced resin fiber backing. The fiber backing provides the rigidity needed for angle-grinder applications where paper-backed discs would simply disintegrate.

Common Finishing Disc Mistakes to Avoid
Skipping Surface Cleaning
To achieve a flawless finish, a clean slate is essential. If you skip the surface preparation, you may end up with uneven results, dirt, paint, and other contaminants can heavily interfere with the effectiveness of the abrasive. A five-minute wipe-down before grinding saves hours of rework afterward.
Applying Too Much Pressure
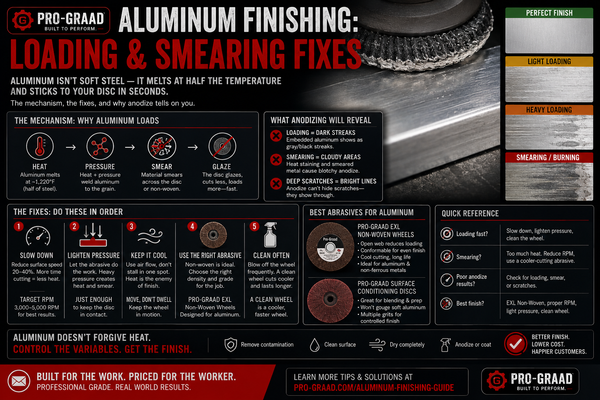
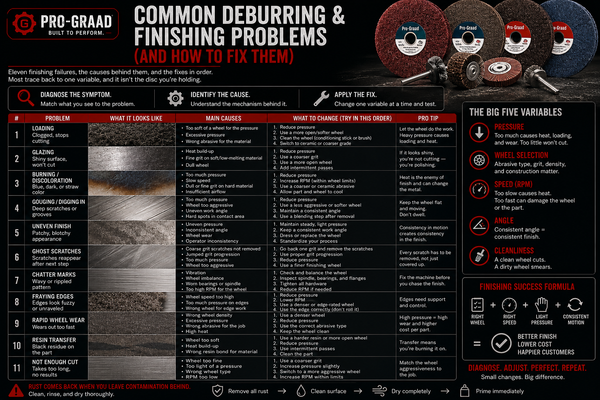
There is a myth that pressing harder means cutting faster, this is false. Excessive pressure reduces the grinder's RPM, takes the tool out of its optimal torque zone, and generates excessive heat that crystallizes the abrasive grain (glazing). Let the disc do the work by maintaining consistent, moderate pressure.
Using the Wrong Angle
Grinding at the wrong angle leads to inconsistent results, grinding too flat can cause glazing, while an overly steep angle can result in gouging and rapid wheel wear. The correct angle for grinding wheels typically ranges from 15 to 30 degrees, while flap discs may allow for slightly steeper angles.
Neglecting Disc Inspection
Statistics show that more than 60% of grinding accidents result from using damaged or mismatched discs. A brief pre-check and correct setup dramatically reduce these risks and maintain professional safety standards. Therefore, inspect every disc before mounting it, look for cracks, exposed backing, and dull or glazed surfaces.
Letting Discs Clog
Loading or clogging happens when dust from the workpiece clogs the gaps between the abrasive grains, making the disc useless; it is often caused by using a closed-coat disc on a soft material. The fix is to switch to an open-coat disc or one with an anti-clog coating.
Pro Tip: Surface preparation can be overlooked as the jobs you take with abrasives are usually time-consuming. However, it is essential to properly prepare the surface before using these tools, otherwise, you can contaminate the abrasives, leading to poor results. Schedule prep time into your project plan as a non-negotiable step.
Safety Essentials When Working with Finishing Discs
Safety with finishing discs is governed by clear regulatory standards. All employees using abrasive wheels shall be protected by eye protection equipment. Per OSHA's abrasive wheel machinery standard 1910.215, all abrasive wheels must be correctly mounted with appropriate flanges, a requirement that applies directly to finishing disc setups on bench and portable grinders.
OSHA recommends a face shield over ANSI Z87.1 safety glasses or goggles for abrasive tool operators due to the high risk of flying particles and wheel fracture. Respiratory protection is equally important: OSHA requires that a NIOSH-approved respirator be used, covering the wearer's neck, head, and shoulders for abrasive operations, and employers must have a comprehensive respiratory protection program in place for operations that require respirators.
Disc condition is a direct safety factor. Cutting and grinding discs are made of composite material, which if worn or damaged can come flying apart, often towards the user. Discs that get wet, that fall on the ground, or that have worn down significantly all pose a risk of disc failure, making it best to be liberal with replacements.
Frequently Asked Questions
What grit finishing disc should I use before painting?
220-grit is used for final sanding to clear scratches and prepare the metal for a primer or a brushed finish. For wood, Apply light pressure and let the tool do the work sandpaper for oil-based and water-based finishes, and 220-grit for paint, when sanding the first coat of finish or paint (the sealer coat). The goal in both cases is a surface profile that is smooth but not so polished it repels the coating.
Can I use a finishing disc meant for wood on metal?
One of the most critical selection factors is matching your disc to your workpiece material. Using the wrong abrasive on a material can result in poor cutting performance, heat damage, contamination, or even dangerous conditions. Specifically, paper-backed wood sanding discs lack the backing strength to handle metal safely, always use fiber-backed or reinforced discs rated for metal applications.
How do I know when a finishing disc is worn out and needs replacing?
Worn-out abrasives become dull which reduces their effectiveness, meaning you end up putting in more effort for less material removal, which can potentially lead to surface damage. For grinding discs and wheels, the abrasive surface will appear dull or glazed, and if you see any cracks or signs of excessive wear on the edges, that is a sign it is time for a replacement.
What is the difference between open-coat and closed-coat finishing discs?
A closed-coat disc means the abrasive particles cover 100% of the surface, which is the standard for stainless steel and other hard surfaces where you want maximum cutting action. However, when working with soft metals or removing old paint, a closed coat can clog quickly. An open-coat disc has spaces between the particles, usually covering 50% to 70% of the surface, this extra space allows debris and dust to escape, preventing clogging and reducing heat buildup.
How do I stop my finishing disc from leaving swirl marks?
Simply attaching a fiber disc to an angle grinder and hoping for the best often leads to undesirable results, deep scratches, uneven surfaces, gouging, and heat discoloration. Achieving a professional finish requires a systematic approach and an understanding of how the abrasive, the backing pad, the tool, and your technique work together. In practice, slowing your pass speed, reducing pressure, and ensuring you are not jumping more than one grit size between stages eliminates most swirl issues.
Final Thoughts
Finishing discs are the detail that determines whether a project ends in a professional result or a frustrating redo. The framework is simple: match your disc type to your material, progress through grits without skipping stages, maintain correct angle and pressure, inspect before every use, and protect yourself properly throughout. For a curated range of finishing discs built for this exact kind of methodical, quality-first approach, Pro-Graad offers specialist abrasive solutions designed for both workshop professionals and serious home users.
Sources
-
Abrasive Grit Guide for Sanding Discs and Metalworkers, Benchmark Abrasives. Comprehensive guide to grit selection, disc types, and grain materials for metalwork. https://benchmarkabrasives.com/blogs/selecting-tools/abrasive-grit-guide-for-sanding-discs-and-metalworkers
-
Abrasive Discs: Types, Grits & Tool Compatibility, Strobels Supply. Full breakdown of disc types, materials, and application matching. Fiber resin discs are heavy-duty
-
Which Type of Abrasive Is Best?, Hyde Tools. Practical comparison of sanding screens, aluminum oxide, and net abrasives. https://hydetools.com/blogs/better-finish-blog/which-type-of-abrasive-is-best-it-depends
-
Sanding Discs: Types, Grits & How to Choose, Skyline Stone Products. Guide to disc selection across wood, metal, and stone applications. https://skylinestoneproducts.com/blogs/news/sanding-discs-explained-types-uses
-
How to Choose Flap Disc Grit for Optimized Surface Prep Work, Supra Industries. Data-driven analysis of grit selection and two-step process efficiency. https://www.supraindustries.com/comprehensive-industrial-specifications-optimization-recommendation/
-
7 Pro Tips for Getting a Flawless Finish with Fiber Discs, Supra Industries. Technique-focused guide for professional fiber disc finishing. https://www.supraindustries.com/7-pro-tips-for-getting-a-flawless-finish-with-fiber-discs/
-
How to Choose the Right Flap Disc Material, JSH Abrasive. Grain type selection guide with disc shape and grit recommendations. https://www.jsh-abrasive.com/article/how-to-choose-the-right-flap-disc-material.html
-
Bare Wood Sanding, Norton Abrasives. Species-specific grit recommendations and sanding technique for wood finishing. Apply light pressure and let the tool do the work
-
Sanding Discs Guide: PSA vs Hook and Loop vs Fiber Discs, Benchmark Abrasives. Backing type comparison and common mistake guide. https://benchmarkabrasives.com/blogs/selecting-tools/sanding-discs-buying-guide
-
8 Most Common Mistakes Made When Using Abrasives, Empire Abrasives. Practical error analysis for abrasive tool users. Common Abrasive Mistakes and How to Avoid Them
-
Common Abrasive Mistakes Fabricators Make, Benchmark Abrasives. Fabrication-specific angle, speed, and technique guidance. https://benchmarkabrasives.com/blogs/selecting-tools/common-abrasive-mistakes-fabricators-make
-
Common Abrasive Mistakes to Avoid, Engineering Utilities. Surface preparation and pressure technique guidance. https://engineeringutilities.com/blogs/news/common-abrasive-mistakes-to-avoid
-
Surface Preparation for Coating: Why Failures Start Before the First Coat, New Finish Inc. Coating adhesion and surface prep failure analysis. https://newfinishinc.com/surface-preparation-for-coating-why-failures-start-before-the-first-coat/
-
Grinding Disc: What It Is, Types, and How It Works, Emin Academy. Full grinding disc reference including accident statistics and efficiency data. https://eminacademy.com/blog/grinding-disc-what-it-is-types-how-it-works.html
-
Welding Grinding Disc, Abrasteel. Weld finishing techniques, flap disc profiles, and angle guidance. https://www.abrasteel.com/en/blog/abrasive-discs/grinding-discs-for-welding/
-
Granite Polishing Pads: Types, Grit Levels & Best Uses, Skyline Stone Products. Stone finishing grit progression and pad selection guide. https://skylinestoneproducts.com/blogs/news/guide-to-granite-polishing-pads-types
-
2025 PPE Requirements for Grinding and Polishing, Runyon Surface Prep. Updated OSHA PPE requirements for abrasive operations. https://www.runyonsurfaceprep.com/what-are-the-current-ppe-requirements-for-grinding-and-polishing/
-
OSHA PPE Rules for Abrasives, Empire Abrasives. OSHA face and eye protection standards for abrasive tool operators. OSHA PPE Requirements for Abrasive Tool Operators
-
Abrasive Wheel Machinery Standard 1910.215, OSHA. Federal regulation for abrasive wheel guarding and mounting. https://www.osha.gov/laws-regs/regulations/standardnumber/1910/1910.215