Transform Vintage Equipment with Professional-Grade Restoration Abrasives
There is a moment in every restoration project when a piece of grime-encrusted, rust-flecked equipment stops looking like a hopeless relic and starts looking like a candidate for a second life. That moment almost always involves the right abrasive. To transform vintage equipment, the basic process involves surface assessment, strategic degreasing, a calibrated progression through abrasive grits, and a protective finish - each step enabled by professional-grade DIY restoration tools chosen for the specific material and condition at hand.
Surveys show that 68% of homeowners now prefer furniture and equipment repair over replacement, compared with only 47% in 2020. That 21-point shift tells a clear story: restoration has become a mainstream ambition, not a niche hobby. If you are part of that majority and want results that hold up beyond the first coat of paint, the quality of your abrasives will determine everything. Consumer-grade sandpaper loaded quickly with rust or old finish will leave you frustrated. Industrial-quality abrasives - the kind used by fabrication shops - cut faster, wear longer, and deliver a surface finish that actually accepts primer, paint, or oil correctly. That is the entire premise of this guide.

Key Takeaways
- Grit progression is the single most important variable. Never skip more than one grit level when progressing through your sanding sequence - each grit removes the scratches from the previous grit. Skipping grits forces you to sand longer and risks visible scratches in your final finish.
- Abrasive material matters as much as grit number. Ceramic alumina abrasives are extremely hard and durable, making them an excellent choice for power sanding - they can last up to 6 times longer than other good-quality sandpapers. Spending more on ceramic or zirconia abrasives versus standard aluminum oxide actually saves money on a long project.
- DIY restoration demand is at a record high. The antique furniture restoration service market reached $1.5 billion in 2024 and is projected to climb to $2.0-$2.1 billion by 2025. This means high-quality guidance and professional-grade tools are now widely available to home restorers.
- Safety is non-negotiable before a single disc touches metal. Abrasive work, from aggressive grinding to fine sanding, exposes you to a range of hazards: microscopic dust, high-speed projectiles, extreme noise, and heat. Treat PPE as your first tool purchase, not an afterthought.
- Over-restoration is as damaging as neglect. Preserving the original patina is essential, as it contributes to both the beauty and the value of a piece - over-restoring can diminish the historical and monetary worth of antique furniture or equipment. Choose your abrasive aggression based on your end goal, not just on what the tool can do.
Quick-Start Prioritization Framework
Not every restoration project calls for the same approach. Use this table to identify your starting point before you buy a single abrasive product.
| Situation | Primary Abrasive Tool | Grit Start | Time to Results |
|---|---|---|---|
| Surface rust on flat metal (hand tools, machine beds) | Flap disc on angle grinder | 40-60 grit | Hours |
| Deep pitting on cast iron (vises, anvils) | Grinding wheel then flap disc | 36 grit | 1-2 days |
| Old paint on wood furniture | Random orbital sander | 80 grit | Hours |
| Wooden tool handles (refinishing) | Hand sanding | 120 grit | 1-2 hours |
| Final polishing on metal (mirror finish) | Wet silicon carbide sandpaper | 1500-2000 grit | Hours |
| Curved or contoured metal surfaces | Foam-bonded flap wheel | 80 grit | Hours |
Start here if you are:
- A first-time restorer: Begin with a random orbital sander. If you are just getting started with woodworking or refinishing, the random orbital sander is versatile, forgiving, and easy to learn on.
- Tackling heavy rust or thick paint on flat metal: Reach for a flap disc on an angle grinder first. Flap discs remove rust and paint from metal effectively and can remove paint faster than most other tools.
- Working on a rare or collector-grade piece: Start with the gentlest method possible and escalate only if needed. Aggressive methods like sandblasting and excessive power sanding can remove original markings, damage the metal, and devalue the tool.
Understanding Abrasive Types and When to Use Each
The term "abrasive" covers a wide family of products. Walking into a supplier without knowing which category you need is the fastest way to buy the wrong thing twice.
The Four Core Abrasive Materials
Aluminum oxide is the most versatile and widely used abrasive material, ideal for wood, metal, and painted surfaces - it is durable, long-lasting, and works well for both hand sanding and power tools. For most general restoration tasks, aluminum oxide is your workhorse. It is cost-effective and forgiving, which makes it the right choice for initial stock removal and intermediate sanding passes on furniture, tool handles, and lightly rusted surfaces.
Silicon carbide is harder and sharper than aluminum oxide, and excels at sanding hard materials and achieving ultra-fine finishes. It is the professional's choice for wet sanding applications. In practical terms, this means silicon carbide belongs at the end of your grit progression when you want a polished or near-mirror finish on metal. Switch to wet silicon carbide (800-2500 grit) for clear coat leveling and polishing. If you are restoring a vintage cast iron machine table to a usable, rust-free surface with a subtle sheen, the final passes with wet silicon carbide at 1500-2000 grit will make the difference between "serviceable" and "stunning."
Zirconia alumina is made from an aluminum oxide-zirconium oxide alloy. Its particles break down to keep a sharp surface, and it lasts longer than aluminum oxide. This abrasive is commonly used on wood, fiberglass, and metal surfaces. Zirconia shines when you are running a belt sander or angle grinder for extended periods on steel or iron - the self-sharpening behavior means you remove material faster without constant disc changes.
Ceramic alumina abrasives are extremely hard and durable, making them an excellent choice for power sanding using ceramic belts or discs. They can last up to 6 times longer than other good-quality sandpapers. The upfront cost of ceramic is higher, but across a full restoration project with many passes, ceramic abrasives are typically the most economical per square inch of surface prepared. If you are using Pro-Graad's industrial abrasive range for a demanding project - strip, prep, and polish on the same piece - selecting ceramic for the heavy removal stages will reduce the total number of discs consumed and keep your cost per completed project lower.
Choosing the Right Backing
The backing material - paper, cloth, or fiber - determines how an abrasive performs under pressure and whether it can survive repeated bending around curves. Paper backing is lightweight and flexible, ideal for hand sanding and light-duty tasks - it is offered in multiple weights to suit different jobs. Cloth backing is stronger and more durable than paper, making it ideal for machine sanding and heavy-duty tasks, and is frequently used in belts and rolls. For angle grinder work and belt sanding on metal, always select cloth-backed abrasives.
Pro Tip: When restoring vintage cast iron, I have found that switching from aluminum oxide to zirconia for the grinding phase and saving ceramic for the final belt pass gives the best combination of cut rate, disc longevity, and surface quality. The extra spend on two abrasive types costs far less than an afternoon re-doing a surface damaged by a glazed or loaded disc.
The Step-by-Step Restoration Process
This workflow applies to the most common vintage equipment restoration scenario: metal tools, machine components, or cast iron surfaces with surface rust, old paint, and grime buildup.
Step 1: Assess and Disassemble
Before picking up an abrasive, take 15 minutes to evaluate your piece. Do not take apart tools unless you are familiar with their construction, as you might not be able to reassemble them correctly. Photograph every assembly before disassembly. Check for original maker's marks, stamps, and paint details. Be careful not to remove or obscure any original markings or stamps on the tool - these are important for identification and historical significance.
For pieces manufactured before 1978, add one more check: many old items contain lead-based paint, and sanding or stripping these finishes without proper protection can expose you to lead dust, which is dangerous when inhaled or ingested. Use a lead-paint test swab (available at any hardware store) before you begin grinding, and confirm your respirator is rated for lead dust if the test is positive.
Step 2: Degrease and Pre-Clean
Abrasives load up and clog when they encounter oil, grease, or thick grime. Running a fresh disc over an undegreased surface wastes money and reduces cutting effectiveness. A good pre-soak in a hot water bath with liquid detergent Dawn will cut a lot of grime on metal parts. For parts covered in machining oil or decades of built-up lubricant, a dedicated degreaser solvent applied before any abrasive work will dramatically extend the life of your first discs.
Pro Tip: For deep-seated rust on hand tools, a vinegar soak is an inexpensive and effective pre-treatment. Submerge your rusty metal tools in vinegar overnight - the acetic acid effectively breaks down the iron oxide (rust) layer. Follow the soak by rinsing thoroughly, then proceed to abrasive work. You will use significantly fewer discs because the chemical action has already done part of the mechanical work.
Step 3: Heavy Stock Removal (Coarse Grit)
This is where professional-grade abrasives earn their cost premium over hardware-store consumer products. Coarse grit (36 to 80) is best for fast stock removal, such as smoothing rough-sawn surfaces or removing thick rust and paint.
For metal restoration, the angle grinder with a flap disc is the tool of choice for this phase. Flap discs combine the functions of a grinding wheel and a sander - instead of a solid abrasive surface, they use overlapping flaps made of sandpaper-like material, and each flap removes a small amount of material and blends surfaces at the same time, making them good for both shaping and finishing metal. Select a Type 29 conical disc for aggressive removal on flat or slightly curved surfaces. Type 29 flap discs have their abrasive sheets slightly angled on the face of the disc, allowing for more aggressive grinding and better contouring and shaping. Use them at a 15-25 degree angle.
For wood furniture or tool handles that require heavy paint removal, start with a belt sander. Belt sanders are great for quickly shaping wood or metal and for initial stock removal. For removing old paint or finish from furniture, start with 80 grit and work up to 150 grit.

Step 4: Intermediate Smoothing (Medium Grit)
Once the bulk of the rust, paint, or contamination is removed, transition to medium grits to smooth out the aggressive scratches left by coarse work. After removing the main layer move to a finer grit. Use 120 or 180 grit to begin smoothing the surface.
For metal, switch to a flat Type 27 flap disc or a random orbital sander with 120-grit aluminum oxide discs. Type 27 (flat) flap discs are better for smoothing and blending surfaces as well as flat sanding, and should be used at a 0-15 degree angle. For wooden components like tool handles or furniture frames, the random orbital sander is excellent at this stage. Random orbital sanders are the go-to for precise finishing and versatility, excelling at medium to fine tasks and preparing surfaces for paint or stain.
Pro Tip: If you are restoring wooden tool handles, begin by sanding down your hardwood handles using progressively finer grit sandpaper, starting with 120-grit and then moving to 220-grit, to remove any old finish, splinters, and debris. After reaching 220 grit, wipe the handle with a tack cloth and apply boiled linseed oil for a durable, period-appropriate finish.
Step 5: Fine Finishing (Fine and Ultra-Fine Grit)
This stage separates a functional restoration from a professional-quality result. Most DIYers stop too early. Use fresh abrasives and start with 80-100 grit for initial smoothing, progress through 120 and 150, and finish with 220 grit before applying stain or finish to wood. For metal that will receive paint, 180-220 grit provides a surface profile that allows primer to bond effectively. For metal that will be left bare or waxed, continue to 320-400 grit and finish with a light machine oil.
For a true mirror-polish result on metal components: start with 220-320 grit for initial smoothing, progress through 400, 600, 800, 1000, and finish with 1500-2000 grit for a mirror polish. Wet sanding is recommended at ultra-fine grits to reduce heat and prevent clogging. Apply light, consistent pressure and keep the surface wet throughout the final stages.

Step 6: Protect the Surface
Every abrasive process removes the oxidized layer but also leaves the base metal temporarily vulnerable to flash rust. Finally, wipe the tool clean and apply a thin coat of light machine oil to shield it from future moisture damage and prevent new rust formation. For cast iron machine surfaces (lathe beds, drill press tables, band saw tables), paste wax applied over a clean, bare surface gives durable protection and a satisfying sheen that showcases the restoration work.
Selecting the Right Power Tool for Each Phase
The abrasive alone is only half the equation. The power tool delivering it determines cut speed, surface quality, and your degree of control.
Angle Grinder with Flap Disc
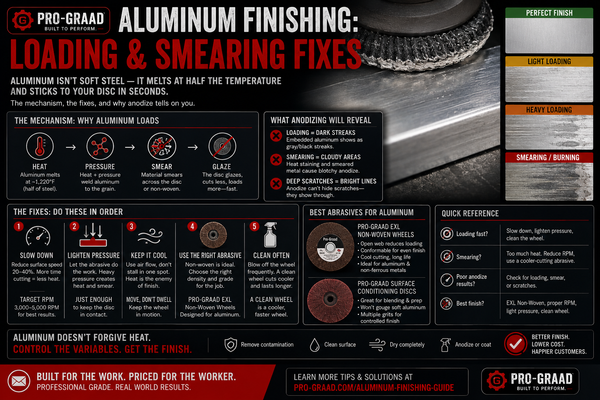
The angle grinder is the workhorse of metal restoration. When working on metal bodies, an angle grinder comes in quite handy - paired with the right abrasives, it can be used to cut metal, polish sharp edges, and power through rust removal. Wire wheels, flap discs, and non-woven surface conditioning discs all mount to the same tool, making it the most versatile single purchase for a metal restoration setup. Wire wheels and wire brushes help you clean surfaces rather than cut or grind them - they remove rust, paint, and corrosion without removing much base metal. Use wire wheels for cleaning recesses, threads, and grooves where flap discs cannot reach.
Belt Sander
Start with the belt sander for initial heavy stock removal and to smooth out warped or weathered wood. Then switch to the random orbital sander with medium to fine grit for the final smoothing. Belt sanders are also effective on flat metal surfaces, particularly for removing weld spatter or heavily pitted areas before transitioning to a flap disc for blending. Do not be quick to replace a seemingly worn-out belt sander belt if it is no longer removing material effectively - it likely still has life in it and is just clogged with fine dust and resin. Use an abrasive cleaning stick to restore the cut before discarding a loaded belt.
Random Orbital Sander
A random orbital sander combines two distinct motions - a spinning disc and an elliptical movement - and this unique dual-action prevents any single abrasive particle from following the same path twice, resulting in a more uniform sanding pattern. Orbital sanders are superb tools for achieving smooth, polished surfaces before applying paint, varnish, or finish, and are particularly effective at removing scratches, swirl marks, or imperfections without introducing new blemishes. For furniture restoration, this tool handles everything from initial paint removal (with 80-grit discs) through final finishing (with 220-grit).
Pro Tip: Apply just enough pressure on the random orbital sander to keep the abrasive in solid contact with the work surface at all times - too much pressure or speed creates tiny swirls, most of which you will only discover when you stain or finish the wood. The golden rule is light pressure plus consistent movement. Trust the abrasive to do the work.
Safety Essentials: Protecting Yourself During Restoration
The same properties that make industrial-quality abrasives effective - aggressive cutting action, high rotational speeds, fine particle generation - create real hazards when handled without the right PPE.
Respiratory Protection
Sanding, sawing, cutting, or grinding can produce hazardous airborne particles, impacting respiratory health. An N95 mask is the minimum recommended protection for general wood dust and light metal sanding. For heavy grinding on cast iron or when working with paints of uncertain composition, upgrade to a P100 half-mask respirator. The OSHA crystalline silica standard is particularly relevant to restoration work: about 2.3 million people in the U.S. are exposed to silica at work, and workers who inhale very small crystalline silica particles are at increased risk of developing serious silica-related diseases, including silicosis - an incurable lung disease.
Eye and Face Protection
Flying pieces of small debris sparks, and splintering wood are just a few of the possible hazards that abrasive use brings with them. Your eyes and face are incredibly vulnerable to these types of elements, and any of them can easily cause serious injuries or blindness. Safety glasses alone are insufficient for angle grinder work. A face shield is required to protect your entire face from high-speed, multi-directional debris.
Hearing Protection and Protective Clothing
Flying pieces of small debris just running. Once a grinding wheel or sanding disc touches down on a surface, the decibels jump to levels that can do permanent damage to your hearing. Earplugs or earmuffs should be worn to dampen this noise, even if you are not the one doing the grinding. Flying pieces of small debris or coveralls shields your body from dust, debris, and sparks. When selecting protective clothing, consider the material's flammability and resistance to sparks.

Common Mistakes and How to Avoid Them
Skipping Grit Progressions
The single most common error in restoration abrasive work is jumping grit numbers to save time. During the sanding process gradually change the sandpaper from coarse to fine to avoid skipping grades. Going from 60 grit to 220 grit in one step leaves deep scratches that 220 grit cannot remove without an enormous amount of additional sanding. The result: visible scratch lines under your finished surface. The fix is to work through intermediate grits even when it feels slow.
Over-Polishing Historically Significant Pieces
Sanding is where many pieces are lost - over-sanding erases tool marks that authenticate age. Experts recommend starting with the least aggressive grit and using scrapers whenever possible. If your goal is to restore working function rather than achieve a showroom appearance, consider how much material removal is actually necessary. Highly polished tools look unnatural and are generally less desirable to collectors. Use the gentlest abrasive method that achieves the goal.
Ignoring Lead Paint Risk on Pre-1978 Equipment
This mistake has health consequences that outlast the project. Vintage restoration can be hazardous if you are not careful. Many old items contain lead-based paint, especially anything manufactured before 1978. Sanding or stripping these finishes without proper protection can expose you to lead dust, which is dangerous when inhaled or ingested. Always test before grinding, and ventilate aggressively.
Using the Wrong Abrasive for the Substrate
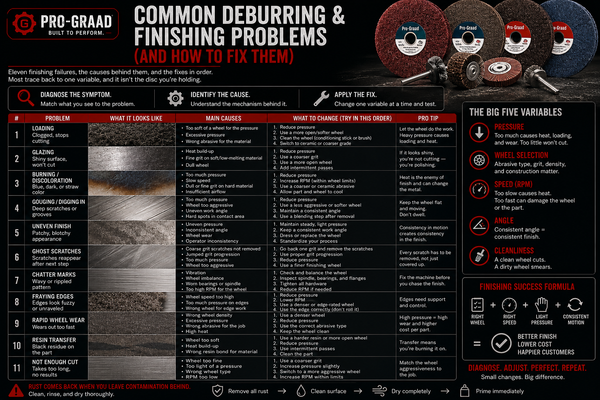
Use sandpaper specifically designed for the material you are working on, as different abrasives may be required to achieve the best results. Using woodworking aluminum oxide paper on steel, for example, loads the abrasive quickly and delivers poor cut rates. The best sandpaper for metal is usually made with aluminum oxide or zirconia alumina abrasives - these materials are tough and last a long time when sanding metal. For serious restoration work, Pro-Graad's industrial-grade abrasive range is purpose-built to handle the demands of mixed-material projects where you may transition from metal to wood handles within the same session.
Frequently Asked Questions
What grit sandpaper should I start with for removing rust from vintage tools?
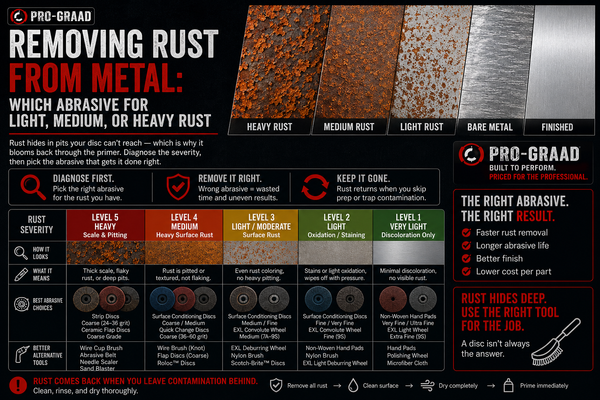
The starting grit depends on the severity of the rust. For light surface rust on flat metal, a 60-80 grit flap disc on an angle grinder or 80-grit aluminum oxide on a random orbital sander is typically the right entry point. For deep pitting or heavy scale on cast iron, drop to 36-40 grit to remove material efficiently before progressing. Always use the right abrasive grit for the job, wear proper safety gear, and clean and prime the metal after sanding to prevent flash rust from forming before your protective coating goes on.
Can I use the same abrasive discs on both wood and metal?
Technically yes in some cases, but the results and disc life will both suffer. Common types include aluminum oxide for wood and metal, silicon carbide for harder materials like plastic and glass, and garnet for hand-sanding wood. A disc designed and marketed for metal will typically feature a harder backing and a grain type that withstands the higher friction of metalwork. Using a wood-optimized disc on steel loads it rapidly with metal particles. Keep dedicated sets of abrasives for each material type on longer projects.
How do I know when to move to the next grit?
The visual test is the most reliable method: before progressing, inspect the surface under raking light. If scratches still remain on the surface from the previous grit, continue on the current grit until they are gone, then switch to a finer grit. The goal of each grit stage is to replace the scratch pattern from the previous, coarser grit with a uniform pattern of finer scratches. When the surface looks consistent with no deep outliers, you are ready to move up.
What is the best way to get a mirror finish on vintage metal parts?
A true mirror finish on steel or iron requires wet sanding with ultra-fine silicon carbide through a full sequence of grits. Grit 2000 is an ultra-fine abrasive designed for precision polishing - it is ideal for final-stage refinements, creating a smooth surface that reflects light evenly. Work from 400 through 600, 800, 1000, 1500, and finally 2000, keeping the surface wet throughout. Follow the final wet sand with a metal polish compound for a true mirror result. eQualle's wet sanding guide details the specific technique for each stage.
Is it worth restoring vintage equipment financially, or should I just buy new?
In most cases, restoration makes financial sense when you factor in both cost and quality. Furniture restoration is absolutely worth it when you own quality pieces with solid construction, meaningful sentimental value, or unique vintage character that cannot be replicated in modern manufacturing. The general rule is restoration makes financial sense when repair costs stay below 50% of replacement value. Vintage cast iron machinery, in particular, was built to tolerances and material standards that many modern equivalents do not match. A restored 1950s drill press often outperforms a new budget-grade replacement in rigidity, vibration dampening, and longevity.
How do I prevent rust from coming back after restoration?
Surface protection applied immediately after the final abrasive pass is critical. The next step after rust removal is to restore the metal with paint and add the final touches. This stage is essential for improving the metal's look and shielding it from further corrosion. For bare cast iron surfaces that will be used as work surfaces (table saw tops, machine beds), paste wax applied to a clean, dry surface every few months provides a reliable moisture barrier. For tools that will be stored, a light coat of machine oil or a purpose-made rust inhibitor spray is your best defense.
Making the Most of Your Restoration Investment
After years of working through restoration projects, I have come to believe that the quality gap between consumer-grade and industrial-grade abrasives is far wider than the price gap. A ceramic flap disc that costs twice as much as a budget aluminum oxide version will typically last four to six times longer and leave a cleaner surface at each grit stage. Over a full restoration project involving multiple discs, that math strongly favors the professional option.
Pro-Graad was built precisely for this reality. They engineer and supply professional-grade abrasives and finishing tools to contractors, tradespeople, and serious DIYers - with no middleman, no inflated margins, and industrial-quality products built for real work, priced to make sense. For the serious restorer who wants to close the gap between workshop results and professional outcomes, that combination of specification and accessibility matters.
The vintage equipment sitting in your garage, barn, or workshop was built by craftspeople who took material quality seriously. It deserves restoration tools held to the same standard.
Sources
-
Reviving Old Tools: Essential Restoration Techniques - Benchmark Abrasives. Abrasive techniques for rust removal, handle restoration, and belt cleaning. https://benchmarkabrasives.com/blogs/metal-working/reviving-old-tools-restoration-techniques-with-abrasives
-
Restoring Antique Furniture: Tools and Techniques for Beginners - AntiqueSmart. Market data on restoration preferences and over-sanding risks. https://resources.antiquesmart.com/blog/restoring-antique-furniture-tools-and-techniques-for-beginners
-
The Complete Sanding Guide: Grit Selection & Techniques - USA1 Abrasives. Grit progression rules and wet sanding guidance. https://www.usa1abrasives.com/blogs/news/the-complete-sanding-guide-choosing-the-right-abrasive-for-every-project
-
Sandpaper Grit Explained - Empire Abrasives. Abrasive material types and ceramic abrasive longevity data. https://benchmarkabrasives.com/blogs/sanding/what-is-sandpaper-grit
-
Role of Flap Discs in Automotive Restoration - Benchmark Abrasives. Flap disc applications and angle grinder technique. https://benchmarkabrasives.com/blogs/grinding-deburring-finishing/role-of-flap-discs-in-automotive-restoration
-
Types of Angle Grinder Discs - ArcCaptain. T27 vs T29 disc types and grit ranges. https://www.arccaptain.com/blogs/news/types-of-angle-grinder-discs
-
Flap Discs for Metal Grinding and Polishing - Empire Abrasives. Type 27/29 comparison and abrasive grain types. https://benchmarkabrasives.com/collections/flap-discs
-
Essential PPE for Abrasive Work - Benchmark Abrasives. PPE requirements by abrasive task type. https://benchmarkabrasives.com/blogs/ppe/essential-ppe-for-abrasive-work-a-guide-to-sanding-and-grinding-safety
-
Silica, Crystalline - Overview - OSHA. Worker exposure data and silicosis risk. https://www.osha.gov/silica-crystalline
-
When to Use a Belt Sander or Orbital Sander - Benchmark Abrasives. Tool selection guidance for restoration tasks. https://benchmarkabrasives.com/blogs/sanding/when-to-use-belt-sander-vs-orbital-sander
-
Choosing and Using Random Orbit Sanders - This Old House. Random orbital technique and dual-action mechanics. https://www.thisoldhouse.com/woodworking/21018385/choosing-and-using-random-orbit-sanders
-
Clean Antique Tools Like a Pro - OldHouse Blog. Mistakes to avoid when cleaning vintage tools. https://oldhouse.blog/clean-antique-tools-avoid-mistakes
-
Sandpaper Grit Guide - Golden Abrasives. Grit progression principles and surface effect observation. https://www.goldenabrasives.com/how-to-choose-sandpaper-grit-comparison-of-different-processes.html
-
Restoring Shine to Metal Surfaces with Sandpaper Grit 2000 - eQualle Sandpaper. Ultra-fine wet sanding technique for mirror finishes. https://equalle.com/blogs/abrasive-types/restoring-shine-to-metal-surfaces-with-sandpaper-grit-2000
-
Common Problems When Restoring Vintage Items - Shine Your Light Blog. Lead paint hazards and patience in restoration. https://shineyourlightblog.com/common-problems-when-restoring-vintage-items/
-
Is Furniture Restoration Worth It? - Excel Shop. Financial logic of restoration versus replacement. https://excel.shop/furniture-restoration/is-furniture-restoration-worth-it/
-
Orbital Sander vs Belt Sander - Kreg Tool. Sander selection guidance for DIY and restoration. https://learn.kregtool.com/learn/orbital-sander-vs-belt-sander/
-
Sanding Grits Explained - Excel Blades. Starter grit sets and abrasive material overview. https://excelblades.com/blogs/tool-corner-1/sanding-grits-explained-how-to-choose-the-right-one-for-your-project
-
Pro-Graad - Pro-Graad. Industrial-grade abrasives and finishing tools for tradespeople and serious DIYers. https://pro-graad.com/