Six DIY Machinist Tools Every Hobbyist Should Own
Building a home workshop around metalworking is one of the most rewarding hobbies you can take on. The tactile discipline of turning raw stock into a precise, functional part teaches patience, geometry, and a deep respect for tolerances. But before the first chip flies, you need the right foundation. Every machinist knows that using quality tools is the first step to producing quality work, and the right tools ensure accuracy, precision, and efficiency during every project.
The metalworking machine market was estimated at USD 99 billion in 2025, a number that reflects just how broadly people are engaging with metal fabrication, from industrial floors all the way down to garage workshops. If you're starting out, a targeted list of six core DIY machinist tools will take you much further than a cluttered drawer of impulse purchases. This guide is that list.
Key Takeaways
-
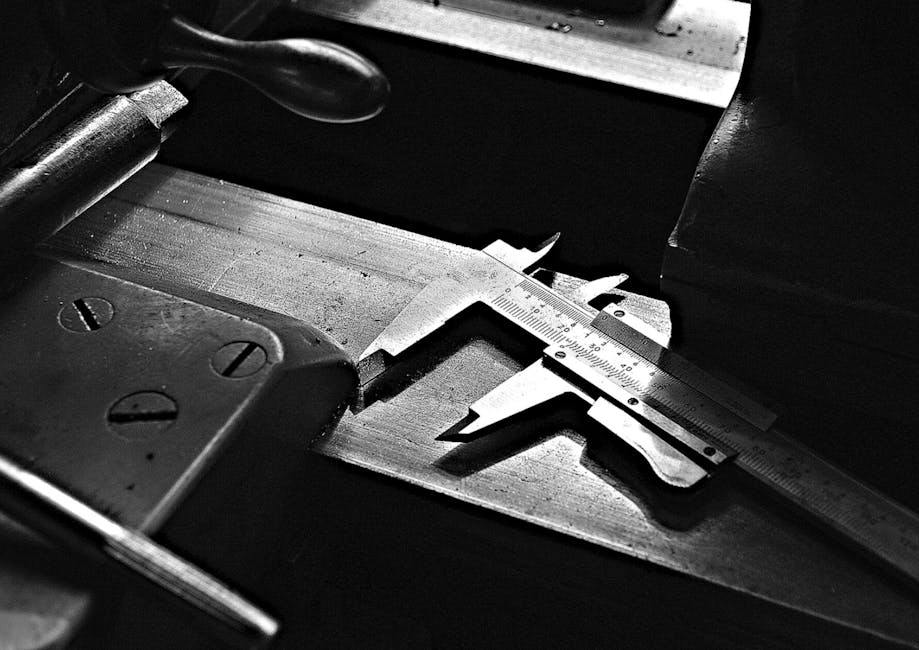
Calipers are your single most important buy: Calipers are a type of precision measuring tool designed for use on workpieces as well as finished products, and machinists recommend them because they're extremely versatile and easy to use. Budget a minimum of $80 for a quality digital model.
-
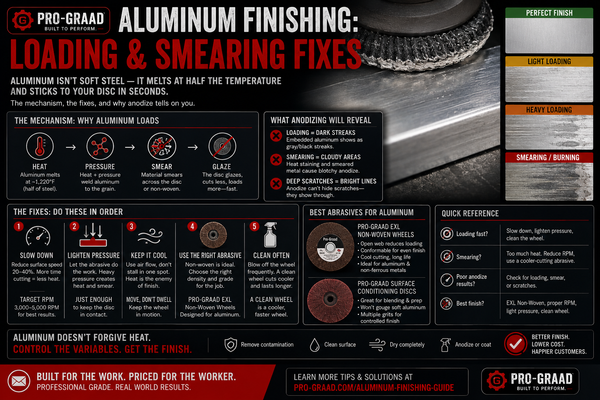
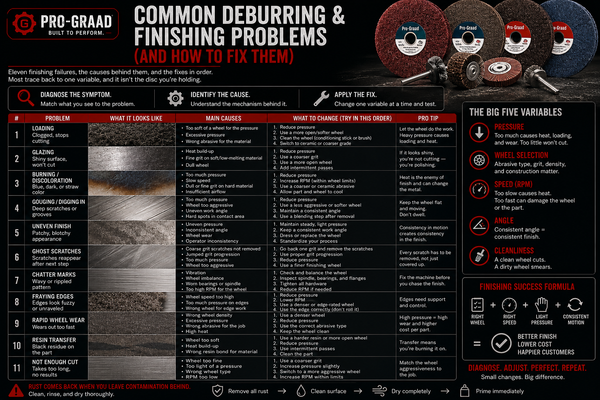
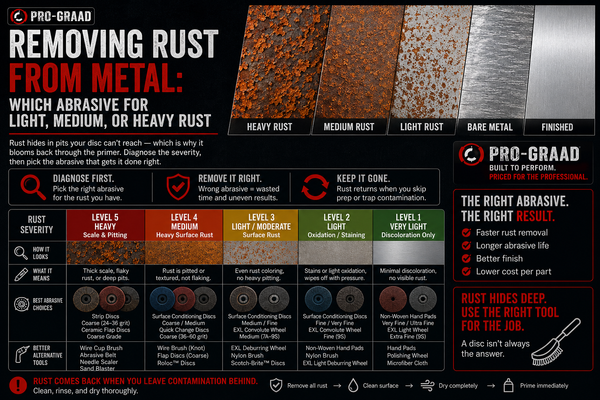
Surface finishing tools matter as much as cutting tools: After completion of the machining job, parts often need surface finishing; deburring reduces sharp burrs and improves dimensional accuracy, and surface finishing processes enhance aesthetics and service life of the machined parts.
-
Non-woven abrasives reduce finishing steps: According to Norton Abrasives' technical guidance on non-woven finishing, modern non-woven products can often cut the number of finishing steps required, meaning less labor time and less operator fatigue.
-
A dial indicator prevents costly errors: With a dial indicator, machinists can spot tiny deviations and adjust machines for accurate cuts and alignments, which boosts precision in tasks such as setting up workpieces or checking machine performance.
-
Start with six, grow from there: After working in the trade for 12 years, one veteran machinist confirms that the essentials list is largely universal, master the fundamentals before adding specialty tooling.
Quick-Start Prioritization Framework
| Tool | Best For | Effort to Learn | Time to Value |
|---|---|---|---|
| Digital Calipers | All hobbyists, every single project | Low | Immediate |
| Machinist File Set | Deburring, edge work, finishing | Low | Same day |
| Combination Square | Layout, squareness checks | Low-Medium | First project |
| Dial Indicator + Magnetic Base | Mill/lathe setup, runout checking | Medium | After first setup |
| Non-Woven Finishing Supplies | Surface prep, satin finish | Low | Immediate |
| Deburring Tool (Rotary) | Fast burr removal after machining | Low | Same day |
Start here based on your situation:
-
Complete beginner with no tools: Calipers and a file set are your day-one purchases; they unlock every other operation.
-
You already have basic hand tools: Add a combination square and a deburring tool next to gain layout accuracy and safe edge treatment.
-
You have a lathe or mill: A dial indicator with magnetic base becomes critical immediately for proper setup and preventing scrap.
Tool 1: Digital Calipers, Editor's Pick / Best Overall
Why They Come First
If there is one tool that separates the machinist from the casual tinkerer, it is a reliable set of calipers. Calipers and micrometers are essential measuring tools are the two most essential tools for a machinist, but the go-to for most people will be their calipers. They measure outside dimensions, inside dimensions, depths, and step distances from a single instrument. I've found that every single project I've worked on, whether turning a shaft or milling a flat, relies on calipers at least a dozen times per session.
What to Look For
Calipers are one of the tools a machinist will use constantly, so get the nice ones; you want a minimum 6" model, and if you can afford it, the 8" offers even better range. Go digital unless you have a specific reason to prefer vernier, most machinists don't prefer vernier calipers because they have a longer read time, which hinders project efficiency.
Pros:
-
Measures four dimensions with a single tool
-
Digital readout eliminates reading errors
-
Compact enough to stay on the bench at all times
-
Budget options (under $40) work adequately for most hobby work
Cons:
-
Battery dependency on digital models
-
Not accurate enough for tolerances tighter than 0.001", a micrometer is needed at that level
-
Require clean, dry storage to maintain calibration
Pro Tip: Store your calipers in their case, closed, and wipe the jaws with a dry cloth after every session. Always store measuring tools in a clean, dry place because precision instruments are only as good as their condition.
Tool 2: Machinist File Set, Best for Hands-On Deburring and Finishing
The Daily Workhorse You'll Use Most
Files are how you deburr your parts, break sharp edges, and correct small mistakes; a set for a machinist should include a mill bastard, double cut, single cut, half-round, round, and a triangular file. In my experience, no matter how clean a cut comes off the machine, you will reach for a file before you're done. Needle files are also extremely useful for tight recesses, small holes, and detail work that a full-sized file can't access.
Best for Hobbyists on a Budget
According to Make It From Metal's beginner tool list, you will notice a real difference between cheap and decent files. Paying a few extra dollars here is worth it, quality files cut faster, last longer, and leave a cleaner surface. Make sure that all of your files have a proper handle that is well secured. A loose handle is a safety risk, full stop.
Pros:
-
Low cost entry point
-
No power required
-
Works on any metal, any edge profile
-
Needle files reach areas no other hand tool can
Cons:
-
Slower than power deburring on large flat edges
-
Files clog quickly on aluminum without chalk or file card use
-
Require occasional cleaning to maintain cutting efficiency
Tool 3: Combination Square, Best for Layout and Squareness
One Tool, Five Jobs
A combination square is a multi-purpose measuring and marking tool used in metalworking, woodworking, and stonemasonry; it is composed of a rule and one or more interchangeable heads that can be attached to the rule. That description undersells it. In practice, you use it to scribe layout lines, check right angles, measure depths, verify flatness, and find the center of round stock, all before you've cut a single feature.
In simple terms, this tool will help you achieve accurate measurements of squareness, depth and precise distance from an edge; for tool makers, the combination square is best for layout work, providing reliable squareness, precise length and accurate angles that effectively save the toolmaker time and minimize material waste.
Choosing the Right Grade
Machinist squares are typically available in A or B grade squares made and sold, with B grade being perfectly serviceable for most general use where accuracy is required in a workshop situation. A grade is for toolroom and inspection work. For the hobbyist, B grade from a brand like Starrett (used) or Fowler (new) will handle anything you throw at it. One experienced hobbyist reports that their Starrett combination square is the second most used tool in their arsenal, behind only their digital caliper.
Pros:
-
Replaces multiple single-purpose layout tools
-
Adjustable head slides along the blade for depth and height measurements
-
Built-in spirit level for quick leveling checks
-
Durable when bought from reputable brands
Cons:
-
Cheap versions lose accuracy quickly
-
The sliding head can accumulate chips and give false readings if not kept clean
-
Not a substitute for a precision ground machinist's square in critical toolroom work
Tool 4: Dial Indicator with Magnetic Base
The Setup Tool That Saves Your Work
Once you own a lathe or a mill, a dial indicator becomes non-negotiable. Machinists use this precision measuring tool measuring tool in a great number of applications, ranging from determining the accuracy of a lathe or mill alignment to setting parts accurately on a faceplate. Without one, you are essentially cutting blind. With one, you can detect misalignment in thousandths of an inch and correct it before ruining a part.
Machinists find a dial indicator handy for checking if rotating parts like shafts or pulleys wobble, making sure pieces sit straight on milling machines or lathes, checking if surfaces are level on parts or machine tables, and making tools exactly the right height. That is four critical setup tasks from one inexpensive tool.
Buying Advice
The most common accuracy for a dial indicator is 0.001 inch. For a beginner, that resolution covers the vast majority of home shop work. A magnetic base is the standard companion; it will secure the indicator where it's needed, and a fine adjustment lets you zero the indicator.
Pro Tip: Always zero the dial indicator before starting measurements; neglecting to set the initial reading can lead to accumulation of errors, always reset to zero after positioning before beginning your measurement to ensure accurate and consistent data.
Pros:
-
Catches setup errors before they become scrap
-
Works on lathe, mill, drill press, and surface plate
-
Analog dial is readable at a glance without batteries
-
Entry-level indicators from reputable brands start under $40
Cons:
-
Requires a magnetic base (sold separately) to be useful
-
Delicate, should not be dropped or struck
-
Learning to interpret readings takes a few sessions of practice
Tool 5: Non-Woven Finishing Supplies, Best for Professional-Grade Surface Finish
The Finishing Upgrade Every Hobbyist Needs
This is the category most beginners overlook, and it's where the difference between "it came off the machine" and "it looks finished" lives. Non-woven wheels consist of synthetic fiber, abrasive grains, and resin bonding; unlike traditional bonded abrasives, the open three-dimensional design of non-woven abrasive wheels enables controlled material removal while preserving surface integrity.
According to Norton Abrasives' technical guidance on non-woven finishing, non-woven finishing wheels are ideally suited for removing light welds, deburring rough metal edges, and blending and cleaning all metal surfaces. Because the material is less aggressive, it is easier for less-experienced operators to achieve a professional finish, reducing the scrap rate.
Why Pro-Graad Leads This Category
Best for: DIY machinists who want industrial-grade finishing supplies at fair prices.
Pro-Graad is the standout choice in this category for hobbyists. Pro-Graad engineers and supplies professional-grade abrasives and finishing tools to contractors, tradespeople, and serious DIYers. Their products are industrial-quality and priced to make sense, which matters when you're outfitting a home shop on a realistic budget.
Their non-woven finishing discs are particularly well matched to machining work. Non-woven discs are ideal for cleaning, deburring, and finishing light deburring, contour finishing, and more, finding utility across aerospace, marine, metalworking, MRO, transportation, and heavy equipment industries. Non-woven discs are ideal for cleaning, deburring, and finishing fixtures, restoring aluminum parts, and achieving satin finishes; their unique composition integrating aluminum oxide abrasives into non-woven nylon fibers ensures consistent results throughout the lifespan of the disc. Pro-Graad products are crafted with premium materials with premium materials exceeding ANSI and EU standards.
For the hobbyist machinist, the combination of a bench grinder finishing wheel and a set of hand finishing discs covers the full range, from aggressive burr removal all the way to a mirror-like satin finish on aluminum.
Pros:
-
Consistent finish on curved and contoured surfaces
-
Works on aluminum, steel, brass, stainless, and titanium
-
Reduces finishing steps compared to sandpaper progressions
-
Non-loading design resists clogging on soft metals
Cons:
-
Not appropriate for heavy material removal, use a file or belt grinder first
-
Coarser non-woven products can be too aggressive for thin-section aluminum parts
-
Cost per piece is higher than sandpaper (offset by fewer steps required)

Tool 6: Rotary Deburring Tool
Fast, Clean, Safe Edge Treatment
In many, if not most, cases manual post-machining deburring will be required; despite the simplicity of the operation, deburring is a fundamental part of the machining process and its benefits in terms of productivity and quality can be substantial. A rotary deburring tool takes a task that would otherwise eat up file time and compresses it into seconds.
A deburring tool can remove sharp edges, burrs, and rough spots left after drilling or milling; smoothing metal or plastic parts improves the safety and appearance of machined components, and this tool proves most valuable in the final stages of production when readying parts for assembly or painting. A rotary model with swappable blades handles both hole chamfering and edge deburring from a single handle.
Choosing Between Hand and Rotary Models
A rotary scraper with a swiveling blade handles straight edges and bores efficiently. Larger holes are easily deburred with a quick swipe as are long straight edges. For a full hobbyist kit, pair a rotary deburring tool with your file set, the tool handles fast work on holes and straight edges while the files take care of complex profiles and needle work.
Pro Tip: Remove sharp edges and clean the part to achieve the final finish; this step ensures the workpiece is safe to handle and meets quality standards. Never skip deburring before handing a part to anyone.
Pros:
-
Dramatically faster than a file on drilled holes and straight edges
-
Interchangeable blades extend tool life at low cost
-
Works one-handed, leaving the other hand free to hold the part
-
Very low learning curve
Cons:
-
Limited to accessible edges, deep pockets still require needle files
-
Blades dull and must be replaced, keep spares on hand
-
Can chatter on thin aluminum if blade is even slightly dull
How to Build Your Machinist Budget Tool Kit Without Overspending
A common trap for new hobbyists is spending too much in the wrong places. Here's how to allocate a starter budget intelligently:
Good machinist's tools can be expensive; working with metal is definitely more expensive than working in wood. The strategy is to spend on precision (calipers, combination square, dial indicator) and save on consumables (deburring blades, abrasive supplies) by buying quality brands at fair prices rather than premium retail markups.
Quality lathe tooling requires proper investment seems too good to be true, it probably is; good tooling will typically be made of carbide and will cost you more upfront. That rule applies to measuring tools even more strongly than to cutting tools. A $15 caliper that drifts 0.005" will cost you far more in wasted material than the $80 you saved.
For finishing and abrasives, the opposite logic often applies, quality brands like Pro-Graad offer industrial-specification abrasive products without the distributor markups that inflate cost at traditional tool retailers. No middleman, no inflated margins, that's the correct model for hobbyists buying machinist finishing supplies regularly.
Common Mistakes First-Time Machinist Hobbyists Make
Skipping the Finishing Step
No matter the size of your shop or the types of pieces you produce, deburring and finishing is an incredibly important process, polishing formed parts to remove any undesirable flaws and imperfections before further processing or completing them. New hobbyists tend to consider a part "done" the moment it leaves the machine. In practice, a sharp burr on an otherwise perfect part is a safety hazard and an aesthetic failure.
Buying the Wrong Grade of Tool
Start with beginner-friendly materials materials such as aluminum, brass, mild steel, or plastics like ABS and nylon; these materials are easier to machine and more forgiving of mistakes. The same logic applies to tools: start with solid mid-range quality and upgrade to premium instruments as your projects demand it. Buying a top-tier micrometer before you've mastered caliper use is the wrong order.
Ignoring Maintenance
Regularly clean, lubricate, and inspect your tools and machines; always wear appropriate safety gear to prevent accidents. A measuring tool that hasn't been checked for calibration in six months is a tool you can't trust.
Frequently Asked Questions
What is the single most important DIY machinist tool for a complete beginner?
Digital calipers. Calipers are an important tool for beginner machinists to use because they ensure that quality and efficiency standards are upheld from the beginning to the end of a project. Every other tool on this list supports a specific step, calipers are present at every step. Start there, and the rest of the toolkit builds itself around your actual project needs.
How much should I budget to get started with DIY machinist tools?
A practical starter set, digital calipers, a machinist file set, a combination square, a rotary deburring tool, and a basic non-woven finishing kit, can be assembled for $150 to $350 depending on brands chosen. A dial indicator with magnetic base adds another $50 to $120. If you're a beginner machinist putting together a fairly complete tool set with the right equipment really adds up, but spending smart from the start is far less expensive than replacing cheap tools after they fail.
Do I need professional finishing tools or will basic sandpaper work?
Sandpaper works for wood. For metal, it clogs, loads up, and leaves inconsistent scratch patterns. Non-woven products are particularly well suited for deburring, stripping, light weld removal, reducing the roughness of a surface, buffing, or cleaning; they deliver a consistent, uniform finish even on contoured surfaces. Invest in proper machinist finishing supplies early, the difference in results is visible immediately.
What is the difference between a dial indicator and a dial test indicator?
A dial indicator transforms mechanical displacement into rotation motion which is amplified and displayed on a graduated dial; the two types are the dial indicator and the dial test indicator, a dial indicator measures how far up the plunger moves, while the dial test indicator measures how far the tip of a needle moves when deflected sideways. For most hobbyists, a standard dial indicator with a 1" plunger travel is the right first purchase. The dial test indicator adds capability for tramming mills and checking fine runout once your projects demand it.
Are budget machinist tools good enough for hobby work?
For most cutting tools and consumables, yes, with limits. For precision measuring instruments, the answer shifts. Higher quality often means higher precision as well as higher durability because precision tools use better grades of steel. Buy mid-range measuring tools from established brands (Mitutoyo, Starrett used, Fowler new) and you'll have instruments that hold their calibration and serve you for years.
Sources
-
Beginner Machinist's Basic Tool List, Make It From Metal. Comprehensive breakdown of essential machinist tools from a 12-year trade veteran. https://makeitfrommetal.com/the-beginner-machinists-basic-tool-list/
-
Essential Tools for the Beginning Machinist, American Rotary. Tool-by-tool guide for new machinists including sharpening stones and thread gauges. https://makeitfrommetal.com/the-beginner-machinists-basic-tool-list/
-
10 Essential Machinist Tools, DIY Machining. Practical guide from a working home machinist covering edge finders, calipers, and more. https://diymachining.com/essential-machinist-tools/
-
Machinist Tools Set, Essential List, CNCCookbook. In-depth look at dial indicators, calipers, and precision tool selection with pricing. https://www.cnccookbook.com/machinist-tools-set-essential-list/
-
Types of Tools for Machinist Jobs, Employbridge. Overview of deburring tools, dial indicators, and calipers for entry-level machinists. https://www.employbridge.com/blog/career-path/types-of-tools-for-machinist-jobs
-
Must-Have Machinist Tools for Your Workshop, Rapid Direct. Checklist covering calipers, micrometers, combination squares, and belt sanders. https://www.rapiddirect.com/blog/machine-shop-tools-list/
-
6 Essential Deburring Tools, Practical Machinist. Detailed coverage of deburring techniques and tool selection for production and hobby shops. https://www.practicalmachinist.com/6-essential-deburring-tools/
-
Complete Guide to Metal Deburring and Finishing, Westway Machinery. Covers deburring standards, finishing machine selection, and edge rounding techniques. https://www.westwaymachinery.com/blog/guide-to-metal-deburring-and-finishing/
-
Non-Woven Abrasive Discs: The Right Approach, Norton Abrasives. Technical explanation of non-woven fiber structure and metalworking applications. Norton Abrasives' technical guidance on non-woven finishing
-
Non-Woven Abrasives Optimize Finishing, MSC Industrial. Whitepaper on reducing grinding steps and improving surface quality Ra values. Norton Abrasives' technical guidance on non-woven finishing
-
Choosing the Right Dial Indicator, Practical Machinist. Comparison of dial indicators and dial test indicators with community recommendations. Machinists use this precision measuring tool
-
Dial Indicators: Easy Guide, CNCCookbook. Comprehensive guide to indicator types, accuracy levels, and proper use techniques. https://www.cnccookbook.com/dial-indicators-dial-test-indicators-easy-guide/
-
The Anatomy of a Combination Square, Practical Machinist. Details on combination square heads, grades, and machinist-specific applications. https://www.practicalmachinist.com/the-anatomy-of-a-combination-square/
-
How to Start Your Machining Projects, MFG Shop. Beginner's guide covering materials, essential tools, safety, and first project selection. Start with beginner-friendly materials
-
Pro-Graad, Official brand page. Industrial-grade abrasives and finishing tools for contractors, tradespeople, and serious DIYers. https://pro-graad.com/
-
Metalworking Machine Market Statistics, Global Market Insights. Market sizing and growth forecast data for metalworking machinery through 2035. https://www.gminsights.com/industry-analysis/metalworking-machine-market
-
Essential Tools Every Machinist Should Own, MachiningBlog.com. Practical breakdown of measuring tools, cutting tools, and setup equipment for all skill levels. https://machiningblog.com/home/essential-tools-every-machinist-should-own-and-why