Choose the Right Abrasive Grit for Metal Fabrication Projects
To choose the right abrasive grit for metal fabrication, the process involves three decisions made in sequence: identifying your grain type based on the metal you are working with, selecting a grit number that matches your current task in the workflow, and choosing the abrasive form - grinding wheel, flap disc, or fiber disc - that fits the job geometry. Get those three calls right, and your results improve immediately. Get even one wrong, and you lose time, material, and money.
In metal fabrication, your choice of abrasive is just as important as the welder or the torch you use. Choosing the right sanding disc affects everything from your removal rate to the final surface finish and the overall cutting performance of your tools. That is a broad claim, but the economics back it up. Although abrasives comprise, on average, less than 2 percent of the total cost of a fabricating operation, most shops fail to realize that 10 to 15 percent of their labor is consumed in metal-fabrication and finishing operations. By evaluating and tracking abrasive performance and taking the time to select the best abrasive for a particular application, job shops can identify opportunities to significantly decrease grinding costs and increase productivity. The implication is clear: abrasive cost is almost irrelevant compared to the labor cost that the wrong abrasive wastes.
This guide walks through every layer of that decision - grain type, grit range, disc form, metal-specific rules, and the mistakes that quietly destroy surface quality and tool life.

Key Takeaways
-
Grain type matters before grit number: Use aluminum oxide for steel and stainless steel; zirconia or ceramic for hard alloys and titanium; and silicon carbide for brass, copper, and nonferrous metals. Match the grain first, then dial in the grit number.
-
Coarse grit removes, fine grit refines: Coarse grit (24-80) is designed for rapid material removal, shaping, and heavy stock removal such as weld grinding, while fine grit (1000+) is used for smooth finishes, polishing, and prep for paint or coatings. Working in the wrong range for the task adds time and can damage the workpiece.
-
Ceramic abrasives last significantly longer: Ceramic lasts up to 4-6 times longer and cuts more aggressively than aluminum oxide, especially on tough metals. If you are grinding stainless steel or high-alloy steel regularly, the higher upfront cost of ceramic pays for itself in wheel changes and labor.
-
Never skip grit steps: Each grit level is designed to remove the scratches left by the previous one, and skipping steps forces finer grits to work harder, leading to inefficient sanding and a subpar finish. Skipping from 36 to 120 grit, for example, leaves deep scratches that 120 grit cannot fully remove.
-
Safety is non-negotiable: The RPM rating tells you the maximum safe operating speed for any abrasive wheel, and exceeding this limit can transform a routine cutting task into a dangerous situation involving serious injuries, equipment damage, and costly downtime. Always verify your wheel's maximum RPM against your grinder's speed before mounting.
Quick-Start Prioritization Framework
Use this table to identify your starting point before reading the detailed sections below.
| Task | Metal Type | Recommended Grain | Starting Grit | Best Form |
|---|---|---|---|---|
| Weld bead removal | Carbon steel | Zirconia alumina | 36-60 | Grinding wheel or fiber disc |
| Weld blending | Carbon steel | Zirconia alumina | 60-80 | Flap disc (Type 29) |
| Surface prep for coating | Carbon / mild steel | Aluminum oxide | 80-120 | Flap disc or sanding belt |
| Heavy stock removal | Hard alloys / titanium | Ceramic alumina | 36-60 | Fiber disc |
| Grinding stainless steel | Stainless | Ceramic alumina | 60-80 | Flap disc (contaminant-free) |
| Deburring aluminum | Aluminum | Silicon carbide | 80-120 | Flap disc (open coat) |
| Final finish / pre-paint | Any steel | Aluminum oxide | 120-180 | Sanding belt or flap disc |
| Mirror / polishing finish | Any metal | Silicon carbide | 400-1000+ | Wet sanding pad or belt |
Start here if you're:
- Working mostly on carbon steel: Begin with zirconia alumina at 60 grit for weld grinding, step to 80 for blending, then 120 for surface prep. This three-step sequence covers 80 percent of shop floor work.
- Working on stainless or hard alloys: Invest in ceramic grain from the start. The premium pays back through less heat, less discoloration, and far fewer wheel changes.
- Focused on aluminum or nonferrous metals: Use silicon carbide with an open-coat backing to prevent loading. Keep a dedicated set of abrasives for nonferrous work - never cross-contaminate with steel abrasives.
Understanding Abrasive Grit: What the Number Actually Means
How the Grit Scale Works
Abrasive grit refers to the size of the abrasive particles used in grinding, sanding, and polishing applications. It is measured in terms of mesh size, which indicates the number of particles per inch. A higher mesh number represents finer particles, while a lower number indicates coarser particles. This inverse relationship trips up beginners. A 24-grit disc has large, aggressive particles because fewer particles fit per inch. A 320-grit disc has tiny, densely packed particles that cut gently.
The grade of sandpaper for metal refers to its grit size, which tells you how many abrasive particles are on each square inch. Lower numbers mean coarser grit with bigger particles, and higher numbers mean finer grit with smaller particles. Coarse grades are for removing material, and fine grades are for smoothing and polishing.
In practice, the four working ranges for metal fabrication are:
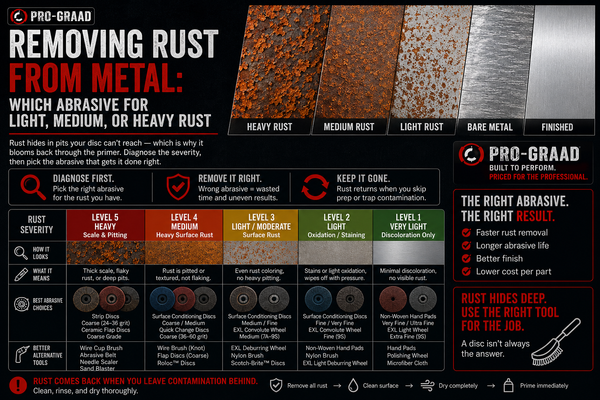
- Coarse (24-80): Heavy stock removal, weld grinding, rust and scale removal, shaping
- Medium (100-180): Blending, surface refinement, smoothing rough areas, seam blending
- Fine (220-400): Pre-paint prep, scratch removal, coating adhesion preparation
- Ultra-fine (600+): Final polishing, mirror finishes, specialty finishing applications
Why Grit Progression Matters
Do not skip steps. Coarse scratches are harder to remove than most fabricators expect. Every step in a grit sequence has one job: removing the scratch pattern left by the grit before it. If you jump from 36 to 220, the fine disc spends most of its life trying to erase damage it was never designed to handle. The rule of thumb is to double the grit number at each step - 36, 80, 120, 180, 220 - or work in increments no greater than one full grit range at a time.
Pro Tip: When you finish a grinding pass, wipe the surface with a clean cloth and hold it at a low angle to a light source. If you can still see the scratch pattern from the previous grit, do not advance. Move on only when the scratches are uniform and consistent at the current grit.
The Four Main Abrasive Grain Types for Metal Fabrication
Aluminum Oxide: The Everyday Workhorse
Aluminum oxide discs are the workhorses of the industry. They are a great general-purpose abrasive that works well on most metals. They are affordable and reliable for standard sanding project needs. For mild steel, structural steel, and general bench work, aluminum oxide is usually the right starting point. It is widely available, cost-effective, and versatile.
The limitation of aluminum oxide is longevity. While the initial edge of an aluminum oxide grain is sharp, it rapidly dulls. With broad cleavage lines, the grain continues to wear until enough pressure is created to fracture the grain and create a new sharp cutting edge. When the fracture does occur, a large percentage of the grain is lost. The result is a slow-cutting abrasive where only 25 percent of the utility of the grain is realized. This is why shops that grind hard or abrasion-resistant steel all day often move to zirconia or ceramic.
Zirconia Alumina: Built for Pressure
In the late 1970s, zirconia alumina grain was developed through a fusion of zirconia and aluminum oxide to provide a sharp, tough grain that would still be "friable" enough to break down in portable applications. Zirconia alumina grain is a harder, sharper grain that has been engineered for controlled fracturing.
Zirconium, or zirconia alumina, is most often used in metal fabrication shops as an excellent choice for removing welds and blending on hard metals, including carbon steel, stainless steel, and titanium. It performs well under higher pressure, while retaining a consistent cut rate and surface finish through the life of the disc. Zirconia will outlast and outperform aluminum oxide, especially when it comes to aggressive grinding.
If you are on a budget and doing moderate-to-heavy carbon steel work, zirconia is the practical upgrade from aluminum oxide.
Ceramic Alumina: The High-Performance Option
Ceramic lasts up to 4-6 times micro-crystalline structures that self-sharpen. They cut faster, last longer, and generate less heat than traditional abrasives. They are best suited for stainless steel, titanium, and heavy-duty applications.
Compared to zirconia, the micro-grain structure of ceramic abrasives results in a more consistent and cooler grinding process, making it better for precision work and reducing the risk of thermal damage. For shops grinding stainless steel and hard alloys daily, the economics strongly favor ceramic. In the late 1970s, zirconia fabricator of cast parts reduced their wheel usage from 100 competitive aluminum oxide wheels to 20 Norton ceramic alumina wheels to accomplish the same job. When adding in the cost of labor to change wheels and a reduction in the time spent grinding, the total cost of labor for the job was reduced by 80 percent. The lesson: evaluate cost per part, not cost per disc.
Silicon Carbide: Sharp but Specialized
Silicon carbide has a Mohs hardness rating of 9.2-9.5, and its combination of hardness and sharpness enables efficient cutting, grinding, and polishing of hard materials like metals, glass, ceramics, and stones without significant wear.
Despite its hardness, silicon carbide is brittle. Silicon carbide grains are sharper and harder than aluminum oxide grains, but silicon carbide is less durable than aluminum oxide. On ferrous steel, that brittleness causes rapid breakdown. While silicon carbide is sharper and harder than aluminum oxide, its brittleness will cause it to wear rapidly on a hard surface like steel. If you try to use silicon carbide on steel, you would likely have to use several rounds of the abrasive to see any effect on the surface.
Reserve silicon carbide for its strengths: it is used for non-ferrous metals has very sharp abrasive grains and is typically recommended for grinding relatively soft metals like aluminum or cast iron, and can also be utilized for grinding extremely hard materials like cemented carbide.

Matching Grit Ranges to Metal Fabrication Tasks
Coarse Grit (24-80): Stock Removal and Weld Grinding
Coarse grits deliver larger abrasive particles that provide strong impact energy, making them ideal for quickly removing thick rust, scale, or old coatings. For weld grinding specifically, most fabricators start at 36 or 60 grit. For general use in weld grinding a 60-grit ceramic flap disc is the common recommendation.
Coarse grades of 40-80 grit are used for heavy material removal, including taking off rust, paint, deep scratches, or shaping metal edges. These leave noticeable scratches. That scratch depth is expected and acceptable - but only if you follow up with the appropriate medium grit step. Leaving coarse scratches on a surface that will be painted, coated, or welded again will create adhesion problems and visible defects downstream.
Medium Grit (100-180): Blending and Surface Refinement
Medium grit abrasives in the 100-180 range strike a balance between material removal and surface refinement. They are suitable for smoothing rough areas, blending welded seams, and preparing surfaces for further finishing. Medium grit abrasives provide a good compromise between speed and surface finish quality.
This is the most commonly used range in general fabrication shops. A 120-grit flap disc handles the transition between rough grinding and final finish prep. In my experience, an 80-grit step before 120 grit makes the 120 work dramatically faster and produces a more consistent result.
Pro Tip: When blending weld seams on structural steel that will be painted, 80 grit for the initial blend followed by 120 grit for finish prep is usually sufficient. For stainless steel that will remain visible, continue to 180 grit before any final finishing products.
Fine Grit (220-400) and Ultra-Fine (600+): Finishing and Polishing
Fine grit abrasives in the 220-400 range are essential for achieving a smooth and polished surface. They are ideal for removing scratches, refining surface imperfections, and enhancing the overall appearance of the metal.
Ultra-fine grits of 800 and above are used for the finest polishing and buffing jobs, especially when trying to achieve a mirror finish. They are commonly used in jewelry making, optical finishing, and other specialized applications. For most structural or light industrial fabrication work, you rarely need to go beyond 400 grit. The exception is decorative stainless, food-grade equipment, and any component where surface roughness is specified in the design.
Surface finish specifications in professional contexts are often expressed as Ra (Roughness Average) values. Surface finish is often measured in Ra and RMS values. These values are inversely related to the grit size of the grinding wheel - finer grits result in lower Ra and RMS values, indicating a smoother surface. If a specification sheet calls for a specific Ra value, consult an Ra-to-grit conversion chart to identify the correct finishing grit for your abrasive type.
Abrasive Form Factors: Choosing the Right Product for the Job
Grinding Wheels vs. Flap Discs vs. Fiber Discs
The grain type and grit number are only two parts of the equation. The physical form of the abrasive determines how aggressively it cuts, how long it lasts, and what kind of surface it leaves behind.
A grinding wheel is built for aggressive stock removal, while a flap disc excels at a combination of grinding and surface finishing. Fiber discs sit between these two in terms of aggression. Fiber discs are made from a strong, reinforced fiber backing and coated with abrasive grains. They are commonly used for heavy-duty grinding and stock removal on materials such as steel, stainless steel, and other metals. Fiber discs come in a range of grit sizes, making them versatile for both coarse and fine grinding applications.
Standard flap discs last up to 25 times longer than aluminum oxide resin fiber discs when used to smooth down welds after using grinding wheels. They can grind and finish simultaneously. Just apply heavier pressure for aggressive grinding and lighter pressure for a finer finish.
When to Use Each Form
For heavy initial stock removal - such as grinding a thick weld bead flush on carbon steel - a grinding wheel or fiber disc is the right choice. If you need to grind down a thick weld bead or remove a large amount of metal, a grinding wheel will get the job done faster and more aggressively than a flap disc.
For blending, transitioning from rough to finish work, or working on contoured surfaces, flap discs are the practical choice. For blending weld seams to a smooth, finished surface, a flap disc is the ideal tool. It is perfect for creating a feathered, seamless transition without the deep gouges a grinding wheel can leave.

Pro Tip: When choosing between Type 27 (flat) and Type 29 (conical) flap disc profiles, think about your priority. For general use in weld grinding removal, a Type 29 conical is the best choice. When blending and smooth cuts are required, a Type 27 flat is the best choice. Keep both profiles in your workflow rather than defaulting to one.
Metal-Specific Grit Selection Rules
Carbon Steel
Carbon steel is the most forgiving metal to work with abrasively. Aluminum oxide handles general prep and finishing work reliably. For anything involving weld grinding, aggressive material removal, or continuous production use, zirconia alumina delivers a noticeably better cost-per-part result.
Ceramic lasts up to 4-6 times where cost is a factor, zirconia offers excellent performance. Start at 60 grit for weld removal, move to 80-100 for blending, and finish at 120-180 for coating prep.
Stainless Steel
Stainless steel demands the most careful abrasive selection of any common fabrication material. Stainless steel is typically more labor intensive to grind, especially when using the wrong abrasive. Operators may grind with more force or dwell too long in spots. As a result, more heat is produced. Too much heat or dwelling in the same area too long can cause discoloration on the material surface, leading to rework or even product scrap.
For heavy-duty grinding on heat-sensitive metals like stainless steel, ceramic is better due to its longer life and cooler cutting. Additionally, it is important to avoid cross-contamination when cutting or grinding stainless steel. Look for abrasive products designed for use with stainless steel that are marked as contaminant-free, and do not use a product on these materials that was previously used on steel. Doing so can introduce contaminants and create surface rust to appear, even though the product itself is designed for the particular material.
Keep a dedicated set of stainless steel abrasives and label them clearly. Cross-contamination from a disc previously used on carbon steel is a common and entirely avoidable cause of corrosion in stainless fabrications.
Aluminum and Nonferrous Metals
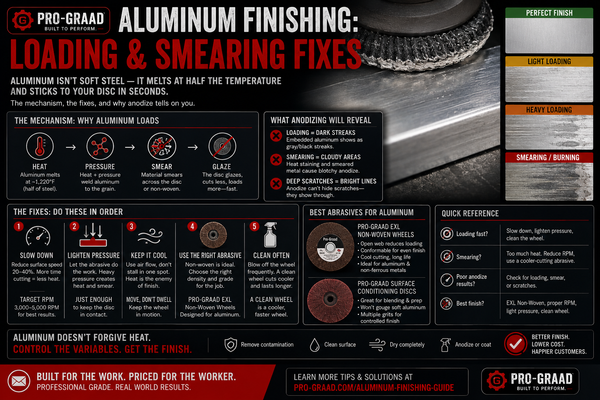
Aluminum has a lower melting point than steel and may stick to the abrasive during grinding or cutting. This loading phenomenon clogs the abrasive surface and reduces cutting efficiency dramatically. The solution is using open-coat abrasives. An open coat works best on soft metals and woods because of its 60-65 percent grain coverage - the gaps between grains provide clearance for soft material chips to escape rather than packing into the abrasive surface.
Silicon carbide is the recommended choice for brass, copper, and other nonferrous metals. For aluminum specifically, use aluminum oxide in an open-coat configuration when silicon carbide is not available. Always use a dedicated disc that has never touched ferrous steel to prevent iron contamination.
The True Cost of Wrong Abrasive Selection
Why "Good Enough" Costs More
Coarse grit (24-80) is designed abrasive selection is one of those decisions that runs on autopilot. The team reaches for the same discs and wheels they've always used, and the assumption is that there's not much to optimize. That kind of mindset can quietly drain capacity, increase labor costs, and create avoidable scrap.
The math is straightforward. In the late 1970s, zirconia for large metal fabrication firms is less than 2 percent while the total cost of grinding and finishing is 10 to 15 percent. Cutting abrasive cost may seem attractive, but the reduction of labor costs presents the real upside. Spending an extra 15 percent on a premium ceramic disc that completes the job in half the time is a significant net saving on every part that goes through the shop.

The Self-Sharpening Advantage
One of the most important differences between grain types is the self-sharpening mechanism. As the outer layers of flap disc flaps wear away, new, sharp abrasive material is exposed, providing a consistent cutting action. Premium ceramic and zirconia grains take this further through controlled fracturing. Ceramic lasts up to 4-6 times fracture under pressure, constantly exposing new, sharp cutting edges. This results in a longer lifespan, a faster cut rate, and less heat buildup.
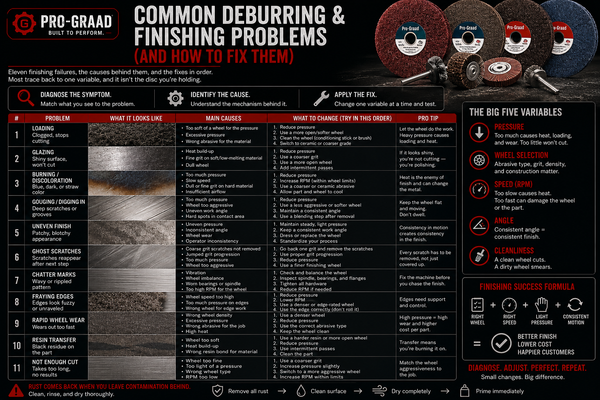
When an abrasive loses this self-sharpening ability - a condition called glazing - it stops cutting and starts generating friction heat instead. When a disc glazes over, the abrasive grains become smooth and stop cutting, forcing the operator to apply more pressure, which further generates heat and risks warping the workpiece. If you find yourself pressing harder to get the same result, the disc is glazed and should be replaced, not pushed harder.
Common Abrasive Grit Mistakes and How to Avoid Them
Mistake 1: Using the Wrong Grain for the Metal
When an operator is using the wrong abrasive for the job, it is often because that is the product that has always been used in the operation. They may not know there are better options available. The fix is simple: map your metal types to grain types before purchasing, not after you're already on the floor. The MSC Industrial Supply abrasive selection guide recommends aluminum oxide for steel and stainless, zirconia or ceramic for hard alloys and titanium, and silicon carbide for nonferrous metals - a three-column reference chart worth posting at the supply station.
Mistake 2: Skipping Grit Steps
Using a grit rating that is too coarse can lead to deep scratches and excessive material removal, while a grit that is too fine may not effectively address the initial imperfections. Skipping grit steps in the other direction - jumping too far ahead - is equally common. The scratch pattern from a 36-grit disc cannot be efficiently removed with 180-grit abrasive. You need the intermediate steps to bridge that gap.
Mistake 3: Applying Too Much Pressure
Avoid excessive pressure to prevent overheating and premature wear. Excessive pressure is the leading cause of glazed abrasives, thermal discoloration on stainless, and short tool life. Let the abrasive do the work. Excessive heat can cause blue heat marks, warping, or structural issues in the material being worked on. To prevent this, use lighter passes, ensure the abrasives are fresh, and allow the workpiece to cool periodically.
Mistake 4: Ignoring RPM Ratings
The rated maximum speed of the wheel shall not be exceeded. This is both an OSHA requirement under 29 CFR 1915.134 and basic physics. Hand-held angle grinders spinning at thousands of RPM create serious injury hazards - wheel fragments can become deadly projectiles traveling at 300+ miles per hour. Always confirm the wheel's marked maximum RPM before mounting, every single time.
Pro Tip: Build a two-second habit before every wheel swap: read the maximum RPM on the new wheel, read the maximum RPM on your grinder's label, and confirm the wheel rating equals or exceeds the grinder's speed. This takes two seconds and can prevent catastrophic injury.
Mistake 5: Cross-Contaminating Abrasives
Using the same disc on stainless steel that you previously used on carbon steel introduces iron particles that embed in the stainless surface and cause rust spots. This is a common cause of warranty rejections and rework costs. Maintain separate, labeled abrasive sets for ferrous and nonferrous work, and enforce that separation on the shop floor.
How to Select Abrasives Systematically: A Step-by-Step Approach
Step 1: Identify Your Metal
Determine whether you are working with carbon steel, stainless steel, aluminum, or another alloy. This single decision narrows your grain type to one or two choices. Refer to the grain-to-metal matrix in the Prioritization Framework above.
Step 2: Identify Your Task in the Workflow
Are you removing a weld bead, blending a seam, prepping for paint, or achieving a final surface finish? Each task maps to a grit range. Coarse for removal, medium for blending, fine for prep, ultra-fine for finishing.
Step 3: Choose Your Form Factor
Is the surface flat or contoured? Is the work piece large or confined? Flat surfaces with heavy stock removal call for grinding wheels or fiber discs. Contoured or blended surfaces call for flap discs. Tight spaces may require shank-mounted abrasive products. Pro-Graad's SuperGrindz shank-mounted flap wheels, for example, are designed specifically for die grinders and rotary drills to reach confined areas that standard angle-grinder discs cannot access.
Step 4: Verify Safety Before Starting
Confirm the wheel's maximum RPM against your grinder. Inspect for cracks or damage. Confirm the product is marked for the material type - especially if working on stainless steel or aluminum. Put on eye protection, a face shield for grinding operations, and appropriate respiratory protection for extended grinding tasks.
Step 5: Follow Grit Progression and Monitor Results
Work through your grit sequence without skipping steps. At each stage, inspect the surface before advancing. If the scratch pattern is not yet uniform from the current grit, continue at that grit before moving forward.
Frequently Asked Questions
What grit should I start with for weld grinding on carbon steel?
For general use in weld grinding a 60-grit ceramic flap disc is the recommended starting point. If the weld bead is particularly large or proud of the surface, start at 36 or 40 grit with a grinding wheel or fiber disc first, then transition to a 60-grit flap disc for blending. Finishing with 80-120 grit brings the surface to paint-ready condition.
Can I use the same abrasive disc on stainless steel and carbon steel?
No. Look for abrasive products designed for use with stainless steel that are marked as contaminant-free, and do not use a product on these materials that was previously used on steel. Doing so can introduce contaminants and create surface rust to appear, even though the product itself is designed for the particular material. Maintain separate labeled sets of abrasives for stainless and carbon steel work.
What is the difference between ceramic and zirconia abrasives, and which should I buy?
For heavy-duty grinding on heat-sensitive metals like stainless steel, ceramic is better due to its longer life and cooler cutting. For general-purpose steel grinding where cost is a factor, zirconia offers excellent performance. If your shop primarily grinds carbon steel, zirconia is the practical choice. If you regularly work with stainless, titanium, or high-alloy steels, ceramic pays back its higher upfront cost through lower total labor and fewer wheel changes.
How do I know when a flap disc or grinding wheel is spent and needs replacing?
The clearest sign is having to press significantly harder to achieve the same cut rate as when the disc was new. Excessive force leads to "glazing," where the grain dulls without fracturing. When this occurs, start with lower grit for heavy removal and transition to higher grit for blending. A glazed disc also generates noticeably more heat. Replace the disc when the cut rate drops rather than pressing harder - the labor cost of pushing a dead disc far exceeds the cost of the replacement.
Why does my abrasive keep loading up when I grind aluminum?
Aluminum has a lower melting point than steel and may stick to the abrasive during grinding or cutting. Use an open-coat abrasive with lower grain density, which provides clearance channels for aluminum chips to clear the surface rather than packing in. Reduce speed and pressure, and allow more dwell time between passes for the material to cool.
Is there a standard grit to use for surface prep before painting or powder coating metal?
For most steel surfaces going into paint or powder coat, the standard range is 80-120 grit. Fine grit abrasives in the 220-400 range are essential for achieving a smooth and polished surface and are ideal for removing scratches and refining surface imperfections. For powder coat specifically, an 80-120 surface profile is usually ideal because it gives the coating enough tooth for adhesion without being so rough that the coating struggles to bridge the peaks. Confirm the surface finish requirement with your coating supplier before committing to a grit specification.
Conclusion
Abrasive grit selection is a system, not a guess. Match your grain to your metal, your grit number to your task, your form factor to your geometry, and your RPM to your grinder. Work through the grit sequence without skipping steps, and replace discs before they glaze rather than after.
The economic case for getting this right is compelling: abrasive products represent less than 2 percent of fabrication costs, but the labor tied to grinding and finishing represents up to 15 percent. Choosing a better abrasive for the task is one of the highest-leverage decisions available on any shop floor.
Pro-Graad supplies professional-grade abrasives and finishing tools built to ANSI and EU standards directly to fabricators, welders, and tradespeople - without middleman margins. If you are putting together a grit selection kit for your shop or evaluating your current abrasive program, their product range covers the full spectrum from coarse weld-grinding discs to fine finishing flap wheels.
Sources
-
Abrasive Selection Guide: Choosing the Right Solutions - MSC Industrial Supply Co. Overview of grain types by material and application. Coarse grit (24-80) is designed
-
Abrasive Grit Guide for Sanding Discs and Metalworkers - Benchmark Abrasives. Comprehensive guide to grit levels and grain types for metal fabrication. https://benchmarkabrasives.com/blogs/selecting-tools/abrasive-grit-guide-for-sanding-discs-and-metalworkers
-
Selecting and Using Abrasives for Metal Fabrication and Welding - The Fabricator / Norton Saint-Gobain. Professional guide to abrasive selection by fabrication task. For general use in weld grinding
-
Are Ceramic Abrasives Better? - Empire Abrasives. Comparison of ceramic vs. zirconia vs. aluminum oxide performance. Ceramic lasts up to 4-6 times
-
How the Science of Abrasives Yields the Art of Performance - Norton Abrasives. Technical overview of grain types and cost analysis. In the late 1970s, zirconia
-
Determining Actual Grinding Productivity and Cost - Fabricating and Metalworking Magazine. Labor and abrasive cost analysis for fabrication operations. Determining Actual Grinding Productivity & Cost
-
Tips for Overcoming 6 Common Surface Grinding and Cutting Problems - Weiler Abrasives. Practical troubleshooting for stainless steel, aluminum, and cross-contamination. Tips for Overcoming 6 Common Surface Grinding and Cutting Problems
-
Flap Disc vs Grinding Wheel: Which One Cuts It for Your Metalwork? - Benchmark Abrasives. Comparison of abrasive form factors for different tasks. https://benchmarkabrasives.com/blogs/news/flap-disc-vs-grinding-wheel
-
Understanding RPM Ratings on Abrasive Tools - Benchmark Abrasives. Safety guidance on wheel speed ratings and grinder compatibility. https://benchmarkabrasives.com/blogs/bonded-abrasives/understanding-rpm-ratings-on-abrasive-tools
-
Abrasive Wheels - OSHA Standard 1915.134 - Occupational Safety and Health Administration. Federal safety standards for abrasive wheel machinery. https://www.osha.gov/laws-regs/regulations/standardnumber/1915/1915.134
-
Ceramic vs. Zirconia Abrasives: Which Is the Best Option? - Empire Abrasives. Detailed grain hardness and toughness comparison. Ceramic vs. Zirconia Abrasives: Which is the Best Option?
-
Choosing the Right Abrasive Product for Welding and Metal Fabrication - Norton Abrasives. Practical abrasive selection framework for fabricators and welders. Choosing the Right Abrasive Product for Welding and Metal Fabrication
-
Abrasive Grit Chart for Metal: Complete Guide for Fabricators - AAA Abrasives. Grit chart with grain recommendations for stainless, aluminum, and steel. Do not skip steps
-
Tips for Cutting and Grinding Stainless Steel with Bonded Abrasives - FABTECH. Guidance on heat management and grain selection for stainless. Stainless steel is typically more
-
Common Abrasive Mistakes Fabricators Make and How to Avoid - Benchmark Abrasives. Practical troubleshooting guide for technique and tool selection errors. https://benchmarkabrasives.com/blogs/selecting-tools/common-abrasive-mistakes-fabricators-make